Hello friends! Here I am. Brought you another tutorial related to rooting your android device. Today’s article is on how to disable DM-Verity or Android Verified Boot without TWRP recovery. Let me explain the topic. That will be easier for you.
As you already know an open-source OS like android facilitates to perform various tweaks. Especially if you are a tech expert. You can start with unlocking the device bootloader. Then you can flash custom recoveries like TWRP, and install various types of custom ROMs. After that, you can go ahead and root your device using Magisk, either using TWRP or not using TWRP.
However, once you install an app and grant superuser permission for that particular app, automatically the app gets access to the system partition. And will be able to take part ib administrative level functions even causing troubles to your device. But you have DM Verity!
Before disabling DM-Verity or Android Verified Boot without TWRP, What is DM Verity?
DM Verity is a security mechanism that is put by Google. And DM stands for Device Mapper. So it’s Device Mapper Verity. DM Verity stops such troublemaker apps from harming the device. Even though he sounds like a good guy, DM Verity restricts the app functions.
I am pretty sure that every rooted user is aware of such troublemaker apps and they won’t install them in the first place. So I am going to help you with disabling DM Verity or Android Verified Boot (AVB) without TWRP recovery. So you will be able to install all the mods and stuff without any problem.
How to Disable DM-Verity or Android Verified Boot without TWRP
Now you might be wondering that why I am going a long way rather than flashing a couple of ZIP files using TWRP to disable the DM Verity. The reason is you don’t have TWRP recovery in all android devices. Moreover, people can root a device without TWRP and can install OTA updates even. Just follow the tutorial and don’t skip any step.
Step 1
Get Stock Boot Image File
To start, you will need the stock boot.img file. To get that file just download the stock firmware for your phone and extract the stock boot.img file. You can refer to our guides to learn about the extraction process. Because it will vary with the file format.
Step 2
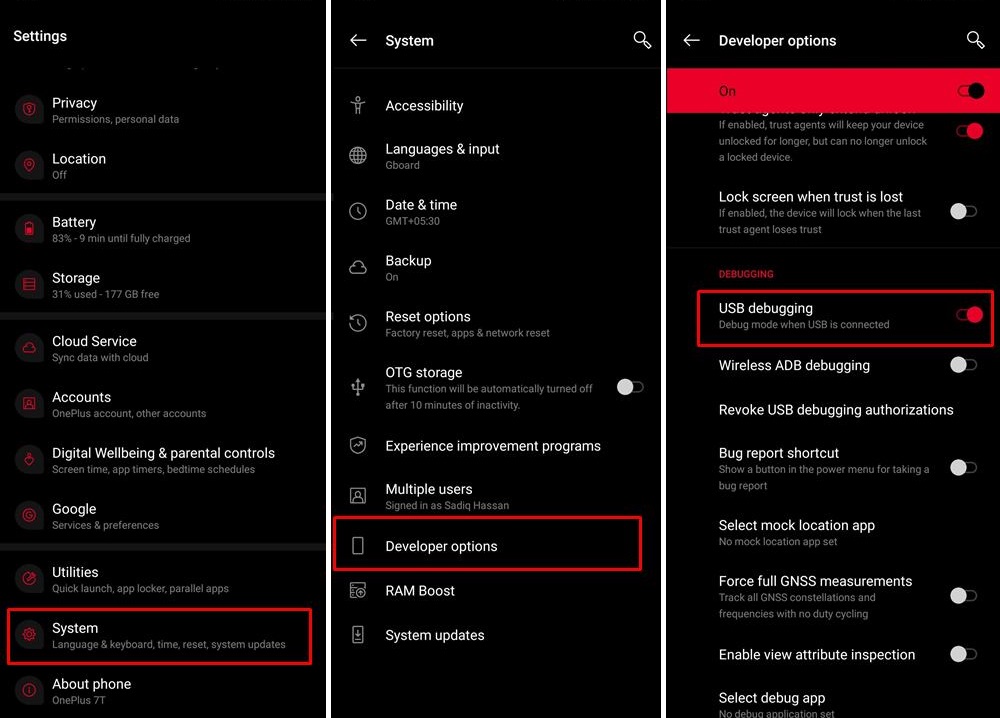
Install ADB and Enable USB Debugging
The next step is to install the Android SDK Platform Tools on your PC. That will help you to get the required ADB and Fastboot Binary files. Thereafter install the Magisk Manager app on your android device. At the same time, we recommend you enable USB Debugging. So that your phone will be recognized by your PC in ADB mode.
What is the use of ADB Mode? Let me answer. ADB mode is essential to boot the phone to Fastboot Mode. Then we are using the fastboot mode to flash a file. Here’s how you gonna enable USB Debugging.
Settings > About Phone > Tap on Build Number 7 times > Go back to Settings > System > Advanced > Developer Options > Enable USB Debugging

Step 3
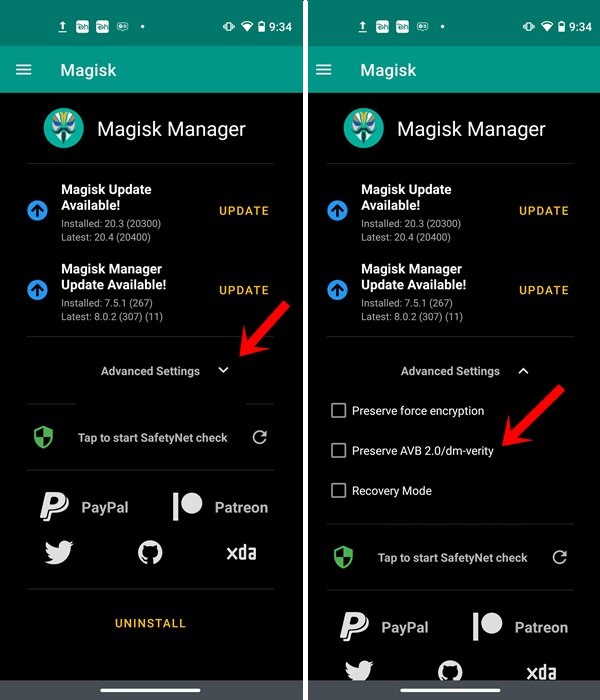
Disable Preserve AVB 2.0/dm-verity
Just follow these steps.
- Firstly launch the Magisk Manager App.
- Then tap on Advanced Settings and uncheck the Preserve AVB 2.0/dm-verity option.
- Please keep in mind that this is a very important step before disabling DM Verity or Android Verified Boot without TWRP recovery.

Step 4
Patch Stock Boot Image File
You will see the steps to patch the stock boot.img file below.
- As the first step transfer the stock boot.img file to your phone.
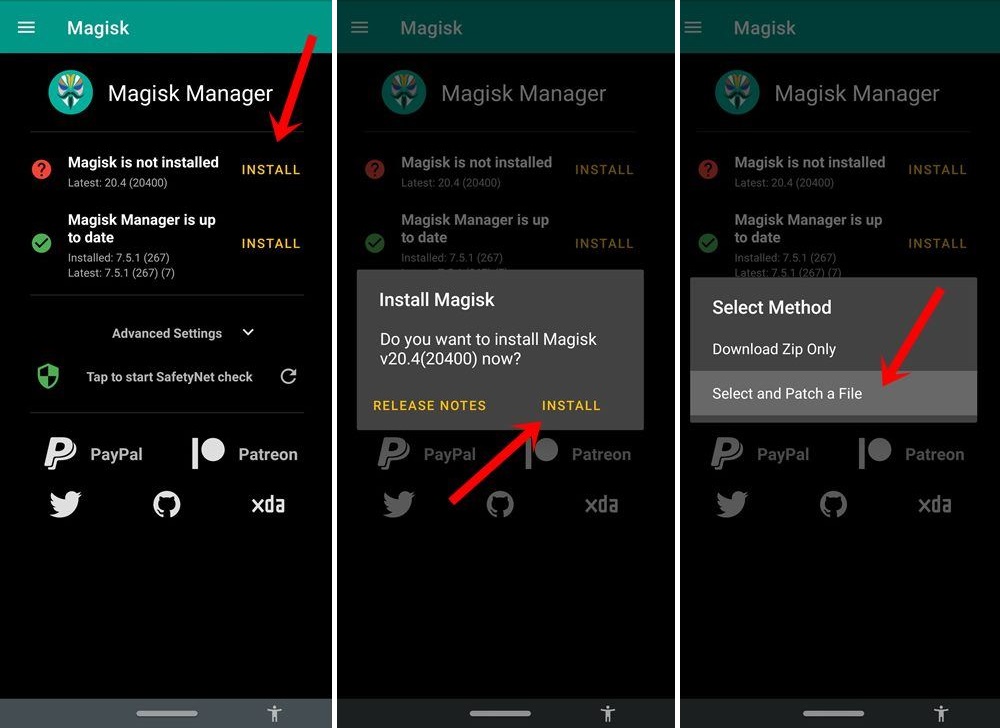
- Then launch the Magisk Manager App and tap on the Install button.
- Again tap on Install in the pop up. (As given in the picture.)
- Now go to Select Method and tap on Select and Patch a file.
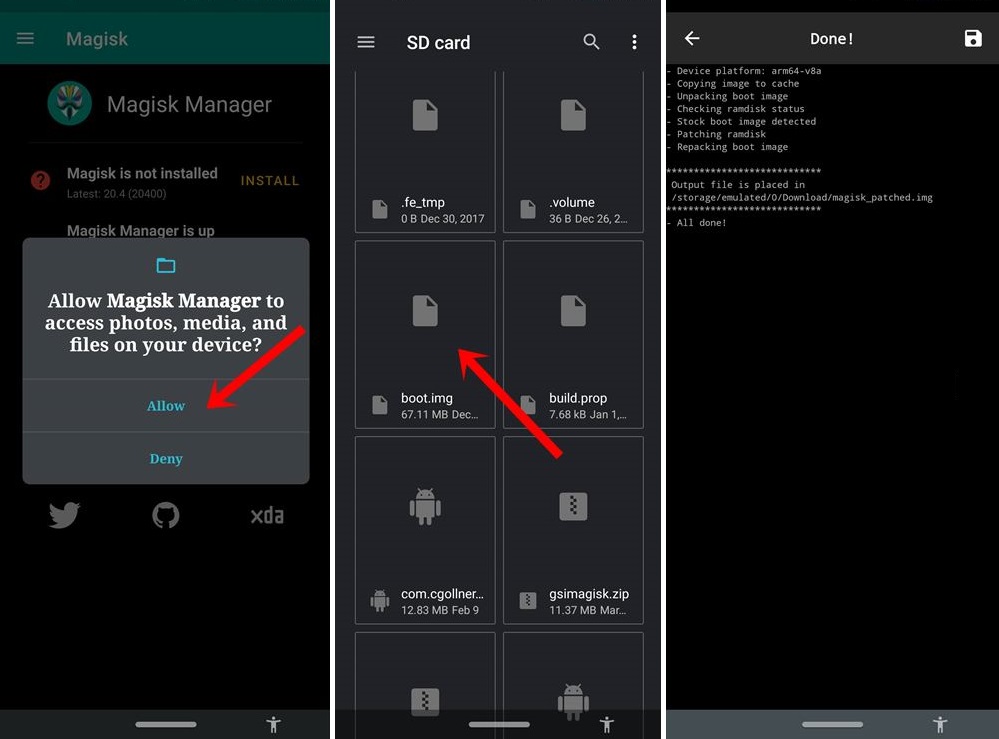
- Select the stock boot.img file. The file might be in .tar format in Samsung devices.
- Now the patching will begin and once it is completed the magisk_patched.img file will be stored in Internal Storage > Downloads.
- Now all you have to do is to copy that file and move to the platform-tools folder on your PC.


Step 5
Flash Patched Boot IMG File and Disable DM Verity

Now we have come to the last step. Here are the instructions.
- First connect your phone to the PC using a USB cable. Check whether you have enabled USB Debugging.
- Now navigate to platform-tools folder.
- Type CMD in the address bar and press Enter. The command prompt will be launched.
- Then type this command to boot the device into the fastboot mode.
adb reboot bootloaderType this command to flash the patched boot.img file.
fastboot flash boot magisk_patched.img- Finally enter this code to reboot the device to the system.
fastboot reboot- That’s all! You are good to go.
Do you think this article on how to Disable DM-Verity or Android Verified Boot without TWRP is helpful? If so, please share this article on Facebook, LinkedIn, etc. And we warmly welcome your queries, comments, and suggestions. Feel free to contact us.
You can join our community and open help Topic under Android.
It’s totally free! And, please don’t forget to like our Facebook page. Thank you very much! Have a nice day! ????
Equipped with a Bachelor of Information Technology (BIT) degree, Lucas Noah stands out in the digital content creation landscape. His current roles at Creative Outrank LLC and Oceana Express LLC showcase his ability to turn complex technology topics into engaging, easy-to-understand content for their websites.
Lucas specializes in writing technology guides. His work is distinguished by its clarity and relevance, making daunting tech subjects accessible and interesting to a broad audience. His guides are not just informative but are a testament to his skill in bridging the gap between technical expertise and everyday usability.
In addition to his tech-focused articles, Lucas has a keen eye for capturing the essence of his surroundings. His writing transcends technology, as he effortlessly brings to life various observations and experiences in his articles. This versatility not only demonstrates his wide-ranging interests but also his ability to connect with readers on multiple levels.
Lucas Noah’s writing is a fusion of technical acumen and a deep appreciation for the world around him, offering readers a unique and insightful perspective on both technology and life.


