Today I am here with another tutorial about Magisk. Basically, this is about How to install Magisk and Root with TWRP. As I have explained to you the very basics in my previous article, Today I am going to go to the facts straight away.
Some of you might aware that there are several ways to install Magisk. However, if you have already rooted your device and looking for a way to access Magisk modules, you can use Magisk Manager in order to install the Magisk framework. And if you are planning to pass SafetyNet in your already rooted device, all you have to do is to switch from SuperSU to Magisk SU.
However, the best way according to my experience is to start by installing Magisk on a non-rooted phone using TWRP. There are several reasons for me for saying that. The main reason is it is hassle-free and clean. You don’t have to remove old root binaries. All you have to do is flash the Magisk ZIP. So that you will be able to root the phone and install Magisk simultaneously and you are close to passing the CTS Profile of SafetyNet. Isn’t it cool?
So now let’s get into the steps of installing Magisk.
1. Install TWRP
As this method works by flashing the Magisk ZIP in TWRP you need to install the custom recovery beforehand. Like with the Magisk, there are various methods to install TWRP. You can use this method if your device is rooted. But after finishing the installation you have to perform a full unroot in Super SU.
What to do if your phone has a Fastboot interface? You can use this guide. On the other hand installation, instructions may vary if your device doesn’t have a Fastboot interface. I am planning to cover those methods in separate articles.
2. Installing Magisk Manager
The next thing you have to do after installing Magisk is to boot into Android and install the Magisk Manager App. But, please keep in mind that this is not Magisk framework. Magisk Manager is an aid for downloading and updating the Magisk framework and managing modules.
Unfortunately, the Magisk Manager app is not available in Google Play Store. Therefore you have to enable Unknown Sources in order to install it. Or else you can download the apk file from the link below.
Download Magisk Manager from APKMirror (.apk)

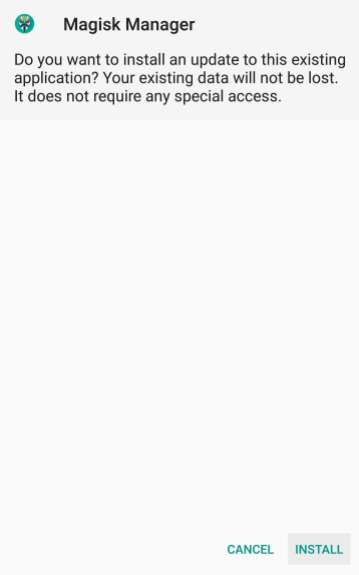
Make sure to download the latest version from that link. Once the download is finished, tap on the Download Complete notification to launch the apk and then tap Install.
3. Download the Magisk Manager ZIP
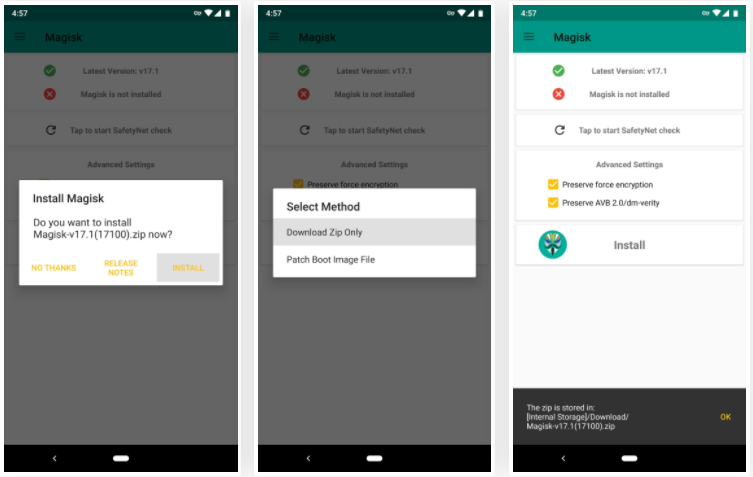
Now you have to open the Magisk Manager App. After that, you will see a pop-up notification asking you to install the Magisk framework. Tap on install and then select Download Zip Only on the next pop-up. And then wait till the message saying the file has been downloaded.

4. Flash Magisk in TWRP
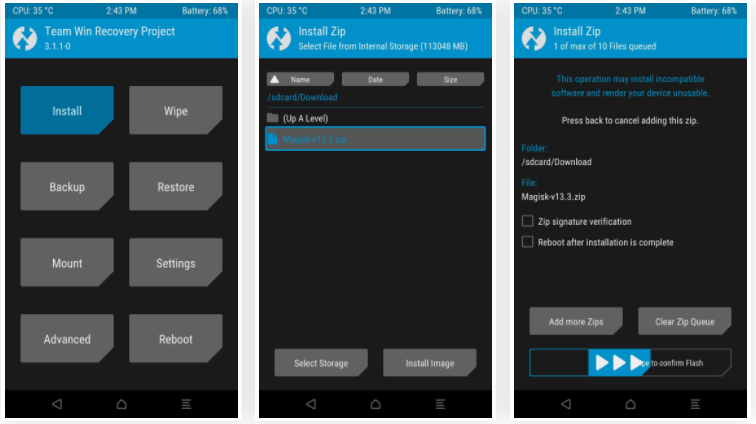
Now what you have to do is to boot your device into recovery mode. Next, go to the main menu in TWRP and tap Install. Then go to the Downloads folder and choose Magisk ZIP. As the last step swipe the slider at the bottom of the screen in order to install Magisk and tap on Reboot System.

5. Verify Root and SafetyNet Status
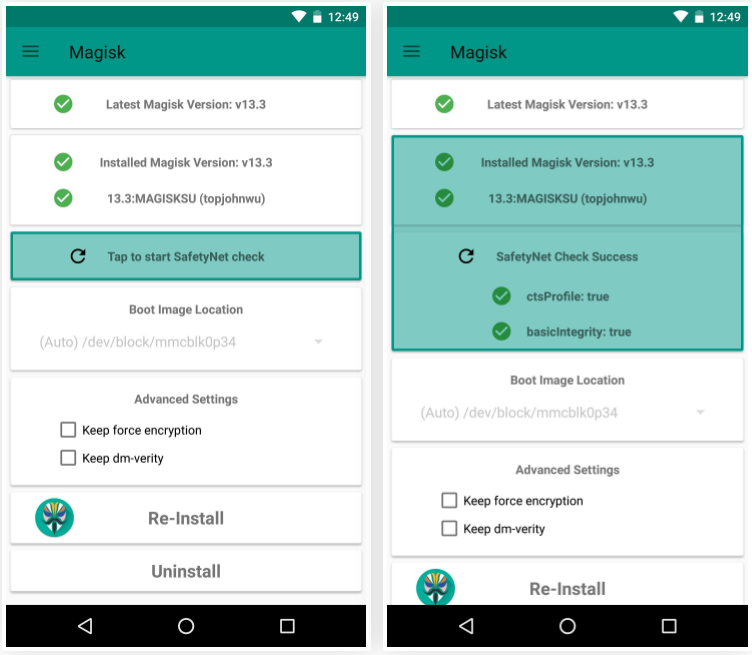
Now you can open the Magisk Manager App. You will see a message at the top of your screen saying MAGISKSU (topjohnwu) with a green checkmark. The meaning of that is your device is rooted successfully in a systemless manner. It is a systemless root because you used Magisk!

Moreover, you can root without tripping SafetyNet if you use Magisk. You can press the button that says Tap to start SafetyNet to make sure that your device still gets through Google’s SafetyNet check. You are lucky if you are seeing two additional green check marks after the test. That indicates you have passed the SafetyNet check!
Do you think this article on How to Install Magisk and Root with TWRP is helpful? If so, please share this article on Facebook, LinkedIn, etc. And we warmly welcome your queries, comments, and suggestions. Feel free to contact us.
You can join our community and open help Topic under Android.
It’s totally free! And, please don’t forget to like our Facebook page. Thank you very much! Have a nice day! ????
Editor’s choice
Equipped with a Bachelor of Information Technology (BIT) degree, Lucas Noah stands out in the digital content creation landscape. His current roles at Creative Outrank LLC and Oceana Express LLC showcase his ability to turn complex technology topics into engaging, easy-to-understand content for their websites.
Lucas specializes in writing technology guides. His work is distinguished by its clarity and relevance, making daunting tech subjects accessible and interesting to a broad audience. His guides are not just informative but are a testament to his skill in bridging the gap between technical expertise and everyday usability.
In addition to his tech-focused articles, Lucas has a keen eye for capturing the essence of his surroundings. His writing transcends technology, as he effortlessly brings to life various observations and experiences in his articles. This versatility not only demonstrates his wide-ranging interests but also his ability to connect with readers on multiple levels.
Lucas Noah’s writing is a fusion of technical acumen and a deep appreciation for the world around him, offering readers a unique and insightful perspective on both technology and life.


