As I have introduced you in the previous articles you can root an android device using two methods. The first one is to use a custom recovery like TWRP. There is a whole article about that. You can read it by clicking here. The second method is rooting the device without using any recovery. So, today’s article is on how to root android devices without TWRP recovery.
Before moving on, I have some basic things to teach you. This information will be helpful for you to understand the rest of the article. Usually, when you root a device a tiny su file will be stored in the system directory of your device. What is the purpose of this file? Basically, that file allows you to have administrative privileges and to get full control of the device. You will be able to customize device settings, install mods, frameworks, audio hacks, and much more.
However, there should be a reason to select this method to root your device. Isn’t it? Actually, there are several reasons. The first one is you don’t need to install and custom recovery which is an additional step. And once you install a custom recovery you won’t receive the OTA updates which are really important. Those updates contain the monthly security updates from Google. So, you are in trouble if you don’t receive those.
Moreover, custom recovery is most useful when flashing a custom ROM, kernel, mod, or other files like ‘.img’ or ‘.zip’ files. In our case, we are focussing only on rooting. So there is no requirement to flash a custom recovery. That’s the basic information I wanted to give you.
Now, let’s move on to the tutorial while keeping those in mind.
Root Android Devices without TWRP Recovery
There are two steps in rooting the device without TWRP recovery. As the first step, you have to boot the device with the help of the patched boot image file. Then that particular image file will be permanently flashed using the Magisk Manager App. These are the two steps in simple terms. But before going to the steps you have to read the following prerequisites and make sure you fulfill them beforehand.
Prerequisites
- You have to download and instal the Magisk Manager apk file on your android device. Note: Magisk app from version 22 and onwards has both the Magisk ZIP and Manager apk files.
- Then check whether your phone has ramdisk. You can check that by launching the Magisk app and refer to the section under Magisk. If that shows a YES, you are good to go. If that shows a NO you have to find a way to do that without Ramdisk.
- You have to unlock the bootloader of the phone.
- Then enable the ‘USB Debugging‘ option. You can do this by navigating like this. Settings > About Phone > Tap on build number 7 times > Go back to Settings > Developer Options > Toggle on the USB Debugging’ switch
- Perform a complete backup of your data.
- Charage your phone. More than 50% will be enough.
- To enter Fastboot commands install ADB and Fastboot Tool.
- Finally download and install USB drivers for your device. Otherwise you may encounter issues when connecting the phone to the PC.
Step 1
Get Stock Boot.img File from Stock ROM
Now let’s get into the business. The first thing you need to do is to extract the stock boot.img file. But the process is more complex than before. Previously it was possible to extract the firmware and get the required partition files with the least effort. But nowadays many OEMs pack the ROM’s IMG files inside an encrypted package. Some have these files within payload.bin, Realme, and the OZIP format. So, we are providing some guides for you to get the stock boot.img file.
- Get the stock boot image file by extracting payload.bin
- Extract OZIP Realme/Oppo Stock ROM (Firmware)
- How to extract Stock Boot.img from OnePlus OxygenOS Stock ROM
Once you have the stock boot image file, you can patch it using Magisk and flash using Fastboot Commands. In this article, I have listed both steps for the older and latest build of Magisk Manager. Apart from the few UI tweaks, the core function is the same in those two. You will see an update that is only relevant to devices running Android 11. You can skip that if your phone is not running that version.
Update (Only for Android 11 users)
I have heard a significant number of android 11 users are having issues with patching the stock boot.img file via Magisk Manager. I have a solution for this. Here’s how.
Firstly you have to install the Magisk Canary build. Not the stable. Secondly, change the update channel to Canary within the app itself. Now you can move forward with the following steps. More Details – Fix Magisk patched boot.img issue while Rooting Android 11
Step 2
Patch the Stock Boot Image File using older Magisk
For explanation purposes and to ensure clarity I am going to split step 2 into two sections. First, let’s have a look at the first section.
- First download the stock firmware for your phone.
- Then extract the boot.img file from within.
- Now you have to transfer the particular file to the internal storage of your device.
- As the next step install Magisk Manager app.

- Open the app.
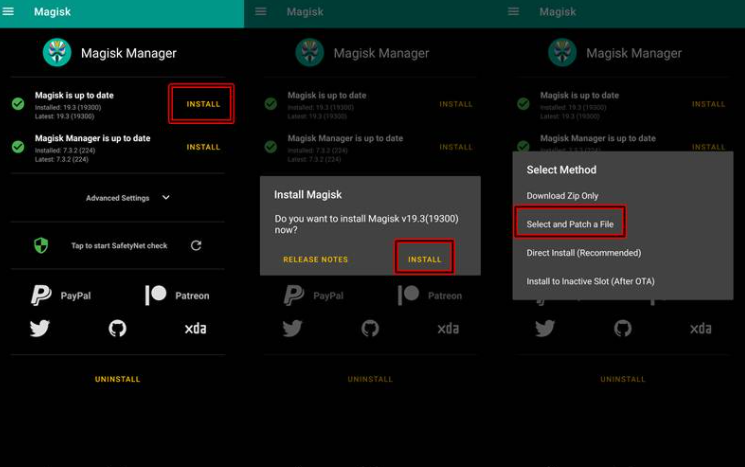
- Then tap on the first install button you see next to Magisk status.
- Select install in the next menu also.
- And then choose Select and Patch a file.
- Now you have to navigate to internal storage and select the stock boot.img file that you extracted previously.
- Now wait untill the patching process is completed. Once it’s finished, just copy the patched boot image file named as magisk_patched.img. from your device.
Now, let’s move to the second section of step 2.
- Firstly you have to launch the Magisk Manager app on your pixel device.
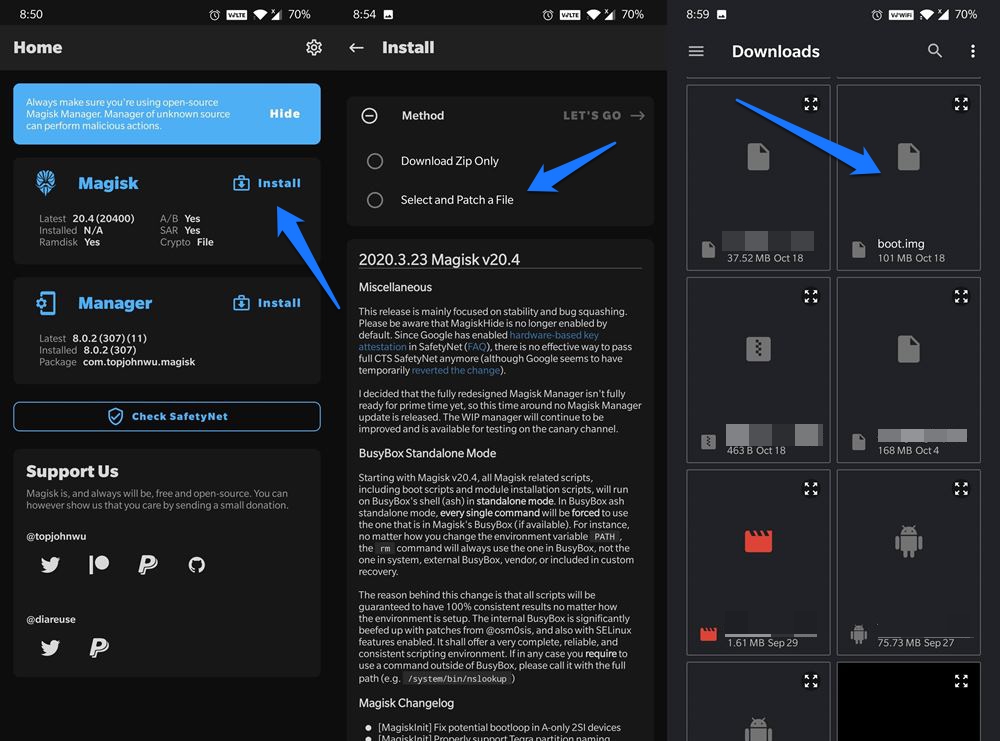
- Then you will see a install button next to Magisk. Just tap on it.
- Choose Select Patch a file from the Method section.

- Now you have to browse to the extracted boot.img file and select the file.
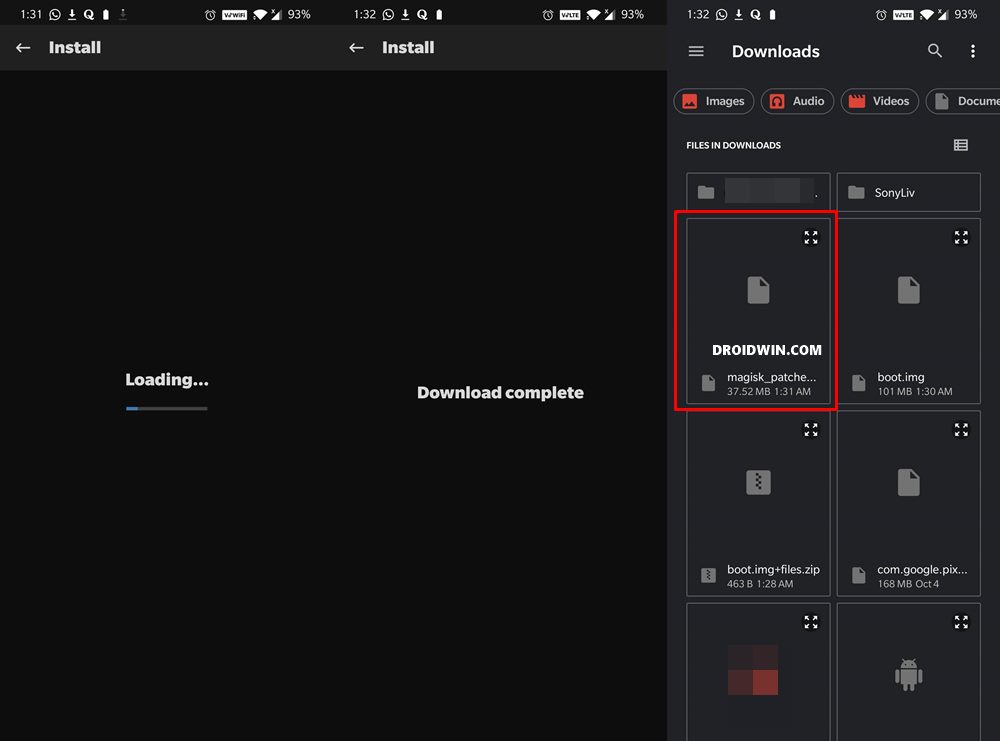
- Then tap on the Let’s Go option at the top right. That will load the boot.img file and patch it accordingly. You’ll see a message saying Download Complete once the patching is done.

- That’s all! The patched boot image will be saved in the following location.
- Internal Storage > Downloads > magisk_patched.img
After following the steps exactly, now you have the stock boot.img file. Now we have to flash it onto your device and go for a root for android devices without TWRP recovery.
In order to do that you have 2 different steps. Either by Magisk or by Fastboot. I recommend you first try to attempt flashing with Fastboot. Try Magisk only if you are having issues with Fastboot. That is because the Magisk method will use the direct install feature. That feature is usually uncommon in most devices. Therefore to prevent any issues you may proceed with the Fastboot method. If that is causing problems, try with Magisk without TWRP.
Step 3
Install the Patched Boot Image using Fastboot
- Firstly you have to connect the device to the PC using a USB cable.
- Then transfer the patched boot file from your phone to the platform-tools folder on your PC.
- Right click on an empty area inside that folder while pressing the Shift key.
- Select Open PowerShell window here from that menu.
- Or else you can navigate to the platform-tools folder on your PC and type CMD in the address bar and press Enter to launch the Command Prompt.
- Now type the following codes.
adb devices- boot your device to fastboot/bootloader mode and flash the patched boot image file
adb reboot bootloader
fastboot flash boot magisk_patched.img- If you have a device with A/B partition, you have to flash the patched boot file to both partitions. Just type the following code for both.
fastboot flash boot_a magisk_patched.img

fastboot flash boot_b magisk_patched.img- As the last step you have to type the following code to reboot the device.
fastboot rebootHereafter you have to be careful. If your phone is rooted just stop here. Use the next method only if the Fastboot method didn’t work for you. Remember the word ‘only‘!
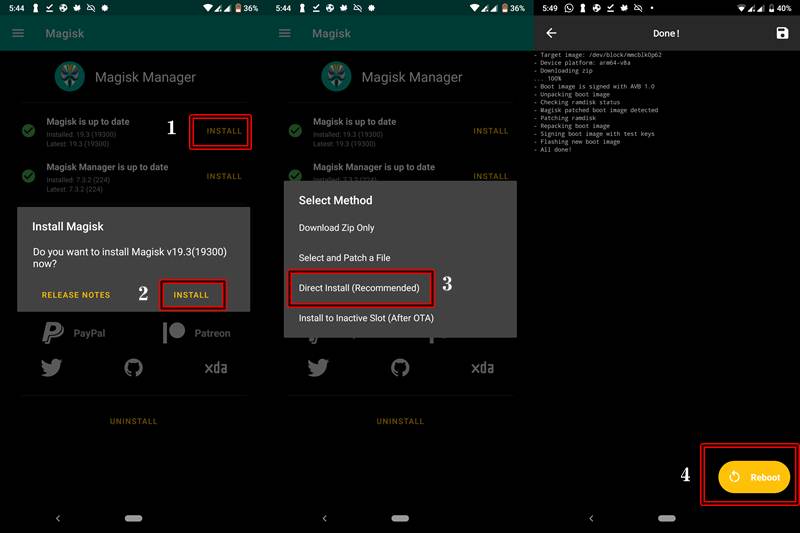
- Firstly open the Magisk Manager app.
- Then tap on the first Install button.

- Tap install button again, which is in the Install Magisk dialog box.
- Then go to the Select Method section and choose Direct Install (Recommend) option.
- So that the flashing will begin. Once the process is finished, tap on the Reboot button. That’s all!
You have rooted the android device without TWRP recovery successfully. Now you can try various mods from the Magisk modules, various frameworks, or even themes.
Do you think this article about how to root android devices without TWRP recovery is helpful? If so, please share this article on Facebook, LinkedIn, etc. And we warmly welcome your queries, comments, and suggestions. Feel free to contact us.
You can join our community and open help Topic under Android.
It’s totally free! And, please don’t forget to like our Facebook page. Thank you very much! Have a nice day! ????
Equipped with a Bachelor of Information Technology (BIT) degree, Lucas Noah stands out in the digital content creation landscape. His current roles at Creative Outrank LLC and Oceana Express LLC showcase his ability to turn complex technology topics into engaging, easy-to-understand content for their websites.
Lucas specializes in writing technology guides. His work is distinguished by its clarity and relevance, making daunting tech subjects accessible and interesting to a broad audience. His guides are not just informative but are a testament to his skill in bridging the gap between technical expertise and everyday usability.
In addition to his tech-focused articles, Lucas has a keen eye for capturing the essence of his surroundings. His writing transcends technology, as he effortlessly brings to life various observations and experiences in his articles. This versatility not only demonstrates his wide-ranging interests but also his ability to connect with readers on multiple levels.
Lucas Noah’s writing is a fusion of technical acumen and a deep appreciation for the world around him, offering readers a unique and insightful perspective on both technology and life.


