Rooting your Galaxy A20 can unlock a world of possibilities, giving you full control over your device and allowing you to customize it to your heart’s content. Whether you’re a tech enthusiast wanting to explore the full potential of your device or simply looking to enhance its performance, rooting your Galaxy A20 is a great way to achieve this.
In this guide, we’ll walk you through the process of how to root Galaxy A20 SM-A205U using the Odin Tool. We’ll also discuss the benefits of rooting, from installing custom ROMs to removing pre-installed apps, and how an A20 root can transform your smartphone experience. So, whether you’re looking to root Samsung A20 or specifically aiming for an A205U root, we’ve got you covered. Read more – Why we want to root – Full Details with guide
Table of Contents
Rooting Galaxy A20: What does it mean?
Rooting your Galaxy A20 essentially means gaining full administrative control over your device’s operating system. This process, often referred to as an A20 root or Galaxy A20 root, allows you to access and modify the software code on the device, or install other software that the manufacturer wouldn’t usually allow you to.
Rooting is different from unlocking your phone, which simply allows you to use your device with different carriers. When you root Samsung A20, you’re delving deeper, breaking down the barriers that the manufacturer has put in place and allowing yourself to fully customize your device. From changing the look and feel of your phone to installing unapproved (by Google) apps, an A205U root can truly open up a world of possibilities.

Benefits of Rooting Galaxy A20
Rooting your Galaxy A20 comes with a host of benefits that can significantly enhance your user experience. Here are some of the key advantages of an A20 root:
- Full Control Over Your Device: Rooting gives you administrative access to your device, allowing you to make changes to the software code and customize your device to your liking.
- Remove Pre-installed Apps: Manufacturers often load devices with unnecessary apps that take up storage space. With a Galaxy A20 root, you can remove these pre-installed apps and free up space.
- Install Custom ROMs: Rooting allows you to install custom ROMs or modified versions of Android, which can offer better performance, more features, and improved battery life.
- Improve Performance: Rooting can help you speed up your device and improve its overall performance. You can overclock your device’s CPU for faster speed or underclock it for better battery life.
- Access More Apps: Some apps require root access to function. Rooting your device can give you access to a wider range of apps.
- Better Backups: With root access, you can use apps like Titanium Backup to back up and restore all of your data, apps, and settings.
- Ad Blocking: Rooting your device allows you to install ad-blocking software that can remove annoying ads from your apps and games.
Remember, while rooting your Samsung A20 can offer many benefits, it’s important to proceed with caution as it can void your warranty and potentially harm your device if not done correctly. Always ensure you follow a trusted guide, like our step-by-step instructions on how to root Galaxy A20 SM-A205U using the Odin Tool.
Risks of Rooting Galaxy A20
While rooting your Galaxy A20 can unlock a host of benefits, it’s important to be aware of the potential risks involved. Here are some of the key risks associated with an A20 root:
- Voiding Your Warranty: Most device manufacturers and carriers will not cover damage caused by rooting or consider a rooted device eligible for warranty.
- Bricking Your Device: If the rooting process is not done correctly, it can render your device unusable, or “bricked”. This is why it’s crucial to follow a reliable guide when attempting to root Samsung A20.
- Security Risks: Rooting can make your device more vulnerable to viruses and malware because it bypasses the security restrictions put in place by the manufacturer.
- Update Issues: Rooted devices may face issues with software updates. Some updates may not install correctly, or they may even unroot your device.
- Performance Issues: While rooting can improve performance, it can also lead to issues if not done correctly. Overclocking your device can cause it to overheat and underperform.
Despite these risks, many users find that the benefits of rooting their Galaxy A20 outweigh the potential downsides. If you decide to proceed, ensure you follow a trusted guide, like our step-by-step instructions on how to root Galaxy A20 SM-A205U using the Odin Tool, to minimize potential risks.

Essential Tips Before Rooting Your Galaxy A20
Before you proceed with the process to root your Galaxy A20, it’s important to keep a few essential tips in mind to ensure a smooth and successful rooting process:
- Back up your data : Before you start the rooting process, make sure to back up all your important data. This includes contacts, messages, photos, and apps. Rooting can sometimes lead to data loss, so it’s better to be safe than sorry.
- Charge Your Device: Ensure your device is fully charged or at least at 60% battery level before you start the rooting process. You don’t want your device to switch off during the process as it can lead to bricking.
- Use a Reliable Guide: Always follow a reliable guide when attempting to root Samsung A20. A step-by-step guide, like our instructions on how to root Galaxy A20 SM-A205U using the Odin Tool, can help you avoid common mistakes and potential damage to your device.
- Understand the Risks: Be aware of the risks involved in rooting. This includes voiding your warranty and potentially bricking your device. Make sure you’re comfortable with these risks before proceeding.
- Download Necessary Tools: Before starting, ensure you have all the necessary tools and software. This includes the Odin Tool and the correct firmware for your device.
- Enable USB Debugging: Before you start the rooting process, you’ll need to enable USB debugging on your device. This allows your device to communicate with your computer during the rooting process.
Remember, while an A205U root can unlock many benefits, it’s not a process to be taken lightly. Always proceed with caution and make sure you’re fully prepared before you begin.
WARNING!
The rooting phone will erase all of your data.
All described operations you are doing at your own risk.
If want saves your data do a backup before start.
The battery should be at least 50% charged before starting.
How to Root Galaxy A20 SM-A205U
Rooting your Samsung Galaxy A20 SM-A205U can be done using the Odin Tool, a popular software for Samsung devices. Here’s a step-by-step guide on how to do it:
Step 1
- Charge your phone up to 50%
- Download Samsung Galaxy A20 SM-A205U USB Drivers and install it to your computer.
- Turn ON USB Debugging and Developer mode on phone.
Step 2
Download Odin program to your Pc
- Now Download Oding program to your laptop or to your Computer.
- after Downloaded, install it and launch.
Step 3
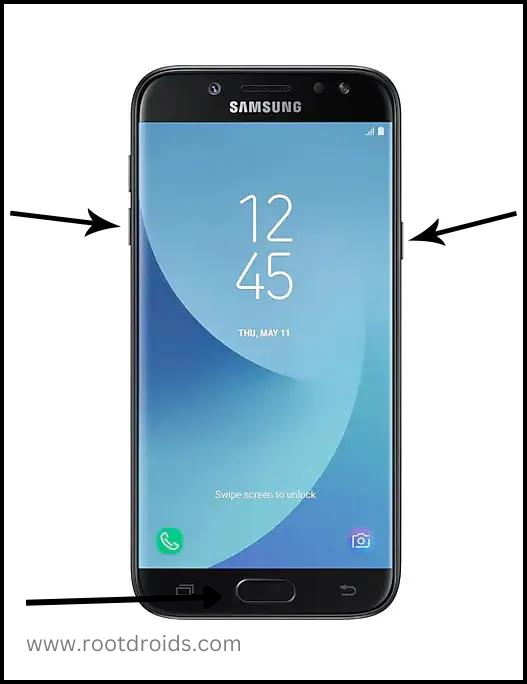
- take your phone and Turn OFF it by pressing power key.
- Now press and hold Power key + Home key + Volume down key until boot to download mode.
Step 4
- Connect your phone to your PC or laptop by using USB data cable. it’s better use original Data cables..
Step 5
Download CF Root file for Samsung Galaxy A20 SM-A205U
- Download CF Root file for Samsung Galaxy A20 SM-A205U . (Yes this zip may include Odin tool again. use one of odin.)
- CF root file is ZIP so, you have to unzip.

Step 6
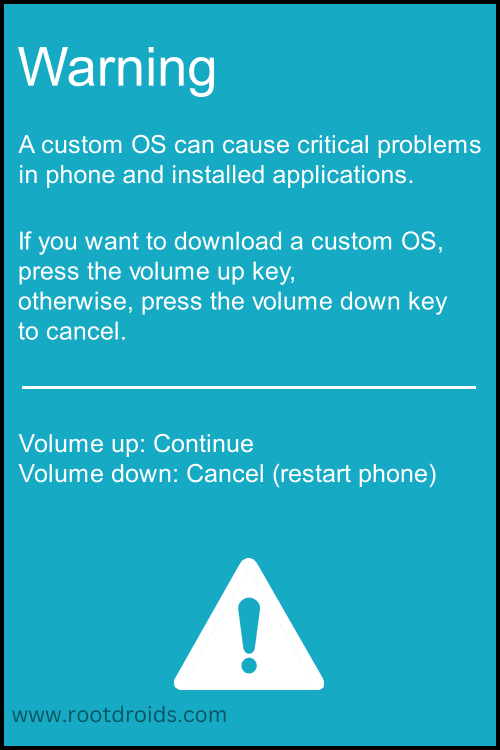
- Now press Volume up key to continue to Download Mode.
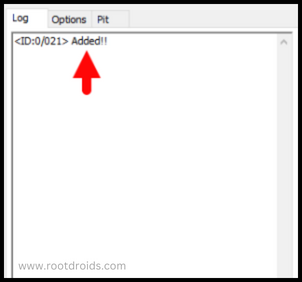
- After tapping Volume up key, you will able to see “Added Message” in odin tool’s notification box
Step 7
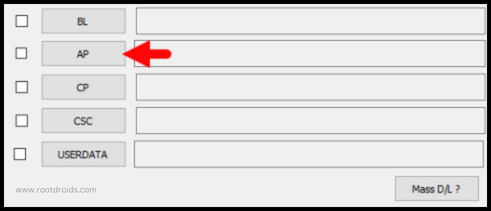
- Click PDA / AP and browse to Downloaded CF-Root file.
- Select “Auto Reboot”
- Read More – Increase RAM SIZE after root
- Start Rooting by Clicking Start.
Step 8
- Please wait until the phone restarts automatically. and it will display Green Pass
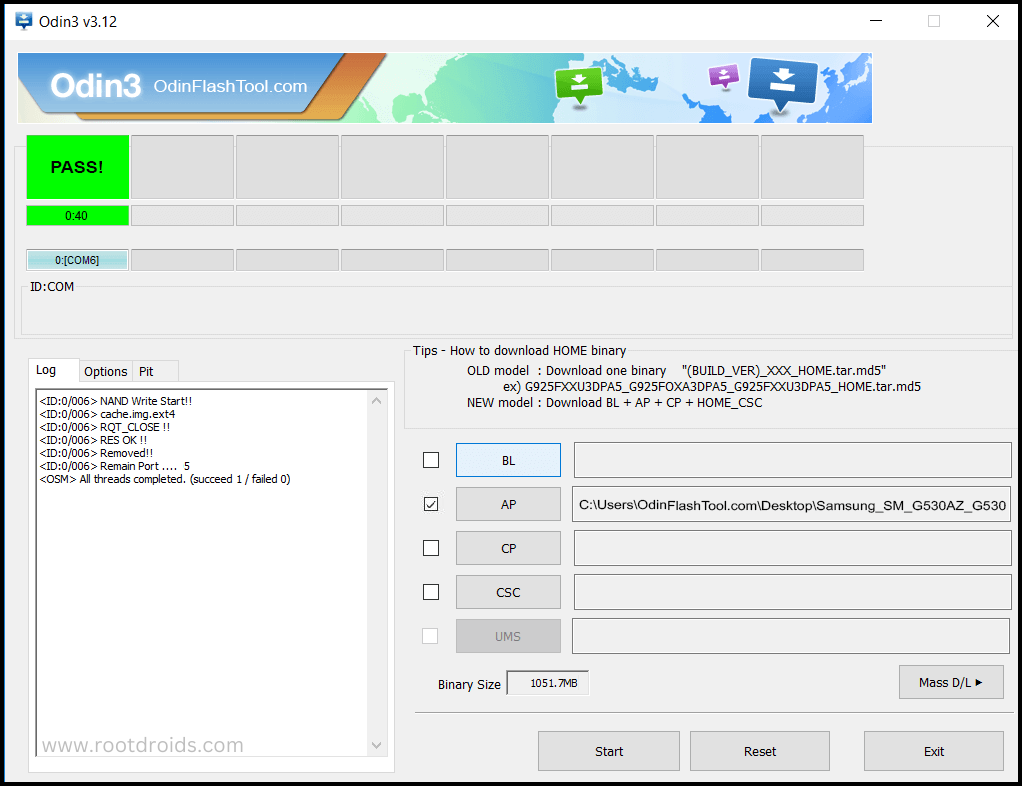
- Last step is, Factory Reset your phone after turn on the phone
- Read more, OK I rooted. Now what next?
Check If Your Android Phone Is Rooted Properly
To confirm if your Galaxy A20 root was successful, there are a few simple checks you can perform. If an application named “SuperSu” is present on your device, then your A205U root has likely been successful. Still unsure? There’s another method to verify. Simply download and use a reliable root-checking app. This handy tool will provide a definitive answer on whether your Samsung A20 root access has been properly established or not. Top 10 Rooted apps for android devices
Unroot Samsung Galaxy A20 SM-A205U
If you’ve rooted your Samsung Galaxy A20 SM-A205U and wish to unroot it, the process is relatively straightforward. Here’s a step-by-step guide on how to unroot your device: More details
Errors And Solutions Section
I can’t root my Samsung Galaxy A20 SM-A205U
- If you have right CF Root file then Please go step by step i’m sure, you can root your phone easily.
My phone model is not listed on chainfire web site?
If you can’t find your phone model number then you have to wait or use different method. because they may be making or updating your phone’s CF file. Don’t worry you can use lot of rooting app to root your phone. More details
Root fail in kingoRoot, Kinguser, framaRoot, kingroot, Vroot, Root Master, z4root, Root Genius
these all are rooting applications. you can use these apps if only they support your phone. if not, you can’t use. so please try above CF Root method. it is the standard way to root mobile phones..
su binary needs to be updated/The Superuser binary (su) must be updated
- unroot your phone
- Remove rooting apps.
- Restart your phone
- Now, follow above guide line step by step.
kinguser binary (su) must be updated
- unroot your phone
- Remove rooting apps.
- Restart your phone
- Now, follow above guide line step by step.
“Unfortunately, kinguser has Stopped” Error in Samsung Galaxy A20 SM-A205U
Restart your device and check. Not works?
- Go to Setting page.
- Go to app/application manager.
- Find kinguser and Delete cache and data
“Unfortunately, kingroot has Stopped” in Samsung Galaxy A20 SM-A205U
Restart your device and check. Not works?
- Go to Setting page.
- Go to app/application manager.
- Find kingroot and Delete cache and data
Root Failed! , No Strategy Found, ConnectionUnstabitil , need root
If you see this type of error that’s mean you have used one of rooting app. We highly recommend you to use CF root method. Go to up and Follow Step by step.
fix Google Play Store error codes like- Error rpc:aec:0] – Error 921,Error – 923, error – 491, Error 110,Error 505,Error 481, Error 923,Error 961,Error 504,Error rh01,Error 919,,Error 101,
1.you had better use New Google account.
2.Go to setting -> apps manager and Find Google play Store and delete apps data. Clear cache,Clear data
3.above method isn’t work? then delete media files and get space.
could not do normal boot odin mode
This happen when you use incorrect CF root file, you can still Switch on the phone. please follow this solution Click here
Stuck on logo screen in Samsung Galaxy A20 SM-A205U
- Go to Odin, switch to DL mode and repeat above steps..
- May be, Downloaded CF Root file is damaged or incorrect.
- If you can’t pass the LOGO then you have to install Stock Rom
- Try again to root with New CF root file
Fix Bootloop on device (continuously restart)
Now you have to perform factory reset your device. to do it. you have to reset your device. To perform reset, you have to remove your battery first and insert back it again.
Now Boot into recovery by holding Volume up button Home button Power key. after that select “wipe data/factory reset” after then select “Yes”. Read more – Dedicated post
Conclusion
In conclusion, rooting your Galaxy A20 can unlock a world of possibilities, allowing you to fully customize your device and enhance its performance. Whether you’re looking to perform an A20 root or specifically aiming for an A205U root, our comprehensive guide provides you with all the information you need to safely root your device using the Odin Tool.
However, it’s important to remember that while rooting your Samsung A20 can offer many benefits, it also comes with potential risks. Always ensure you’re fully prepared and understand the process before you begin. And if you ever wish to revert back to the original state, you can easily unroot your device following our guide.
Whether you’re a tech enthusiast wanting to explore the full potential of your device or simply looking to enhance its performance, rooting your Galaxy A20 is a great way to achieve this. So, go ahead and unlock the full capabilities of your device, and transform your smartphone experience with a Galaxy A20 root.
Frequently Asked Questions
Can I still receive software updates after rooting my Galaxy A20?
Yes, you can still receive software updates after rooting your Galaxy A20, but there may be some complications. Some updates may not install correctly on rooted devices, or they may cause issues with the root access. In some cases, a software update may even unroot your device. Therefore, it’s important to proceed with caution when updating a rooted device.
Will rooting my Galaxy A20 void my warranty?
Yes, rooting your Galaxy A20 will most likely void your warranty. Most device manufacturers and carriers do not support rooting and consider it as a violation of the device’s terms and conditions. This means that any damage caused by rooting or to a rooted device will not be covered under warranty. However, unrooting your device can potentially reinstate the warranty, depending on the manufacturer’s policy.
How can I unroot my Galaxy A20?
Unrooting your Galaxy A20 is a straightforward process that involves flashing the stock firmware using the Odin Tool. You’ll need to download the correct firmware for your device, enter Download Mode, and then use the Odin Tool to load and install the firmware. Once the process is complete, your device will automatically reboot. You can verify the unroot by using a root-checking app from the Google Play Store.
Equipped with a Bachelor of Information Technology (BIT) degree, Lucas Noah stands out in the digital content creation landscape. His current roles at Creative Outrank LLC and Oceana Express LLC showcase his ability to turn complex technology topics into engaging, easy-to-understand content for their websites.
Lucas specializes in writing technology guides. His work is distinguished by its clarity and relevance, making daunting tech subjects accessible and interesting to a broad audience. His guides are not just informative but are a testament to his skill in bridging the gap between technical expertise and everyday usability.
In addition to his tech-focused articles, Lucas has a keen eye for capturing the essence of his surroundings. His writing transcends technology, as he effortlessly brings to life various observations and experiences in his articles. This versatility not only demonstrates his wide-ranging interests but also his ability to connect with readers on multiple levels.
Lucas Noah’s writing is a fusion of technical acumen and a deep appreciation for the world around him, offering readers a unique and insightful perspective on both technology and life.


