
Knowing how to root Samsung Galaxy J1 Ace SM-J110F can unlock a world of possibilities for your device. Rooting is a process that provides users with privileged control over various Android subsystems. Essentially, it allows you to go beyond what the manufacturer intended, giving you the ability to make your phone truly your own.
However, rooting SM-J110F is not a task to be taken lightly. It requires a thorough understanding of your device and the process. This is where Odin Tool comes into play. Odin is a powerful utility software developed by Samsung for its Android-based devices. It opens up a user-friendly interface that makes the rooting process much more manageable, even for beginners. This guide will walk you through the steps to root your Samsung Galaxy J1 Ace SM-J110F using the Odin tool. Read more – Why we want to root – Full Details with a guide
Table of Contents
Understanding the Pros and Cons of Rooting Your SM-J110F

Rooting your Samsung Galaxy J1 Ace can unlock a world of possibilities, but it’s not without its downsides. Before you decide to root SM-J110F, it’s essential to weigh the pros and cons.
Advantages of Rooting Your SM-J110F
Greater Customizability
The biggest advantage to rooting your SM-J110F is the increased level of customization. You can change just about every aspect of your device’s UI, from the icons to the boot animation.
Improved Performance and Efficiency
Rooting can also lead to improved device performance. You can overclock your device to make it run faster, or underclock it to improve battery life.
Disadvantages of Rooting Your SM-J110F
While the benefits of rooting your SM-J110F are enticing, there are a few potential drawbacks to be aware of.
Risk of Bricking Your Device
One of the main disadvantages of attempting to root SM-J110F is the risk of turning your device into an expensive brick. If the rooting process goes wrong, you might end up with a device that’s unusable.
Voiding Your Warranty
Another potential con of rooting the SM-J110F is that it usually voids your warranty. This means that if anything goes wrong with your device, you’ll be responsible for the cost of repair or replacement.
In conclusion, whether you should root SM-J110F depends on your specific needs and technical expertise. It’s always best to fully understand the process and risks before proceeding.
8 Steps To Root SM J110F
Note – First Back up your data
Step 1
- Charge your phone up to 50%.
- Download the Samsung Galaxy J1 ace SM-J110F USB Driver and install it on your computer.
- Turn ON USB Debugging and Developer mode on the phone.
Step 2
Download the Odin program to your PC
- Now Download the Odin program to your laptop or to your Computer.
- After downloading, install and launch it.
Step 3
- Take your phone and Turn it OFF by pressing the power key.
- Now press and hold the Power key + Home key + Volume down key until boot to download mode.

Step 4
- Connect your phone to your PC or laptop by using a USB data cable. It’s better to use original Data cables.
Step 5
Download the CF-Root file for Samsung Galaxy J1 ace SM-J110F
- Download the CF-Root file for Samsung Galaxy J1 ace SM-J110F. (Yes this zip may include the Odin tool again. Use one of the Odin.)
- CF root file is ZIP so, you have to unzip it.

Step 6
- Now press the Volume up key to continue to Download Mode.

- After tapping the Volume up key, you will able to see the “Added” message in the Odin tool’s notification box.

Step 7
- Click PDA / AP and browse to the downloaded CF-Root file.
- Select “Auto Reboot“.

- Start Rooting by Clicking Start.
- Read More – Increase RAM SIZE after rooting
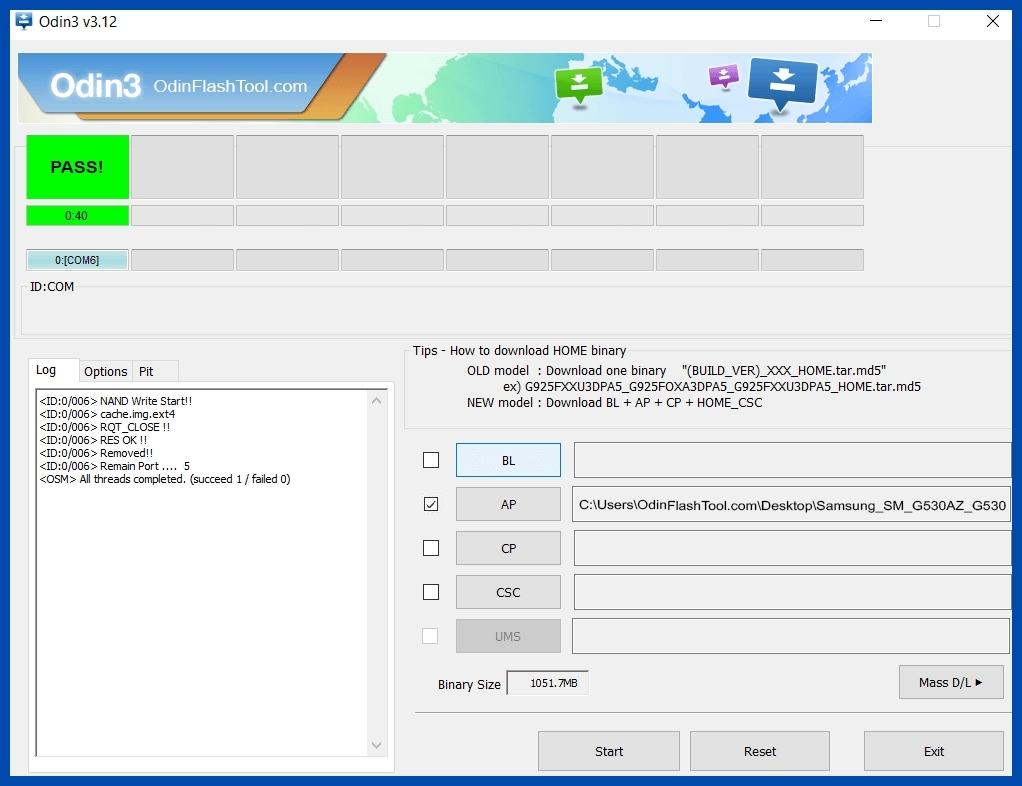
Step 8
- Please wait until the phone restarts automatically and it will display a Green Pass.
- The last step is to Factory Reset your phone after turning it on.
- Now, Congratulations you have Successfully Rooted 🙂
- Read more, OK I rooted. Now what next?
Verifying Successful Root of SM-J110F Samsung Galaxy J1 Ace
Confirming the successful root of your SM-J110F Android phone can be achieved using a few straightforward steps. If an app named “SuperSu” appears on your device, then your SM-J110F is indeed rooted. Still, if doubts persist, there’s an alternative method to prove whether your SM-J110F Galaxy J1 Ace has been rooted or not. Utilize the specific root-checker app, and it will conclusively confirm if your phone has root access. Top 10 Rooted apps for android devices
How to Unroot SM-J110F After Rooting with Odin Tool

Once you’ve successfully managed to root Samsung Galaxy J1 AceSM J110F you might find that you no longer need root permissions. Should this be the case, the next logical step would be to unroot your device. Unrooting the SM-J110F isn’t a complex procedure and can be accomplished by following a few straightforward steps. For a comprehensive guide on how to effectively unroot your rooted SM-J110F, click here for more details.
Conclusion
Rooting your Samsung Galaxy J1 Ace SM J110F with the Odin Tool is a straightforward process. By following the steps outlined above, you’ll be able to unlock the full potential of your device, giving you greater control and customization options. Remember, rooting your SM-J110F isn’t a process to be rushed. Take your time, follow each step carefully and you’ll successfully root your device. Whether you’re a seasoned tech enthusiast or a beginner, the Odin Tool makes the process of rooting your SM-J110F easier and hassle-free. Unlock a whole new world of possibilities with your rooted Samsung Galaxy J1 Ace today!
Frequently Asked Questions
I can’t find my Samsung Galaxy J1 Ace SM-J110F model on the Chainfire website. How can I root without it?
If your phone model, such as the Samsung Galaxy J1 Ace SM-J110F, is not listed on the Chainfire website, it could mean that they are either making or updating your phone’s CF file. In such a situation, you might have to wait or you could use a different method to root SM-J110F. Don’t worry, there are a plethora of rooting apps available that can help you root your phone. We recommend doing thorough research before proceeding with any alternative methods. Click here for more details.
Why did my attempt to root SM J110F using applications like kingoRoot, Kinguser, framaRoot, kingroot, Vroot, Root Master, z4root, and Root Genius fail?
The applications mentioned – kingoRoot, Kinguser, framaRoot, kingroot, Vroot, Root Master, z4root, Root Genius – are all rooting applications. However, their success in rooting your Samsung Galaxy J1 Ace SM-J110F depends on whether they support your specific phone model. If they don’t, you won’t be able to root your device using these apps. In such cases, it’s recommended to try the CF-Root method. This is a standard and widely accepted way to root mobile phones, including the root SM-J110F.
I recently tried to root SM J110F and now I’m getting the message “su binary needs to be updated/The Superuser binary (su) must be updated.” How can I fix this?
It sounds like you’ve run into a common issue after attempting to root SM-J110F. Don’t worry, it’s fixable. First, you need to unroot your phone. This can be done by removing any rooting apps that you’ve installed. After this, restart your phone to ensure all changes have been correctly implemented. Once these steps are completed, you should follow the guidelines on how to root Samsung Galaxy J1 ace SM-J110F with Odin Tool step by step. This will help you to root SM J110F without encountering the “su binary needs to be updated” error.
What’s the process to successfully root my Samsung Galaxy J1 Ace SM-J110F using the Odin Tool if I see the “Kinguser binary (su) must be updated” error?
If your device, specifically the Samsung Galaxy J1 Ace SM-J110F, is already rooted and you’re encountering an issue such as “kinguser binary (su) must be updated”, you might need to unroot your phone first before you can successfully root it again. Here are the steps you need to follow:
- Remove all rooting apps from your phone. This includes any apps that were installed during the initial rooting process.
- Once you’ve removed the rooting apps, restart your phone.
- After rebooting, you can now proceed to root your SM-J110F. Make sure to follow the provided guide step by step to ensure a successful rooting process with the Odin Tool.
Remember, it’s important to be cautious when performing these actions as they can affect the functionality of your device. If you’re unsure, it’s best to consult with a professional.
How can I fix the “Unfortunately, kinguser has Stopped” error while trying to root sm j110f?
If you’re facing the “Unfortunately, kinguser has Stopped” error while attempting to root sm-j110f on your Samsung Galaxy J1 ace SM-J110F, here are some steps you can take to resolve it:
- The first step is to restart your device and check if the issue persists.
- If restarting doesn’t work, navigate to your device’s settings page.
- From there, go to the app or application manager.
- Find the kinguser app and delete its cache and data.
After following these steps, your problem with rooting the SM j110f should be resolved.
How can I fix the “Unfortunately, kingroot has Stopped” error on my Samsung Galaxy J1 Ace SM-J110F?
If you encounter the error message “Unfortunately, kingroot has Stopped” while trying to root SM J110F, you can follow these steps to resolve the issue:
- Restart your Samsung Galaxy J1 Ace SM-J110F and check if the problem persists.
- If the problem continues, navigate to the Settings page on your device.
- From the Settings page, proceed to the App or Application Manager.
- Locate the Kingroot application and then delete both the cache and data.
Doing this should help fix the issue and allow you to continue with your process to root SM-J110F. If this does not work, you may need to consider other methods or troubleshooting steps.
What should I do if I encounter errors such as “Root Failed! , No Strategy Found, ConnectionUnstabitil, need root” while trying to root SM J110F?
These types of errors usually occur when you have used a rooting app. It’s highly recommended to use the CF root method when you want to root SM-J110F. This method is particularly effective for the Samsung Galaxy J1 ace SM-J110F. Please follow the step-by-step guide provided above to root your device successfully and avoid these common issues.
How can I fix Google Play Store error codes like Error rpc:aec:0, Error 921, Error – 923, error – 491, Error 110, Error 505, Error 481, Error 923, Error 961, Error 504, Error rh01, Error 919, and Error 101 on my rooted SM J110F?
To fix these Google Play Store error codes on your rooted SM-J110F, you can follow these steps:
- Consider using a new Google account. This often resolves many Play Store error codes.
- Go to settings, then proceed to the Apps Manager. Here, find the Google Play Store and delete the app’s data. You should also clear the cache.
- If the above method doesn’t work, try to delete media files to free some space. This can often resolve issues related to insufficient storage, which might cause some of these errors.
Remember, though, that these steps are general solutions and may not work for every error code or every situation.
What should I do if I encounter the “could not do normal boot odin mode” error while trying to root sm j110f?
This error typically occurs when you use an incorrect CF root file while trying to root your SM-J110F device. Despite this, you can still switch on your phone. To solve this issue, you should follow the specific solution provided in this guide ( Click here). The guide offers a step-by-step process on how to effectively root sm-j110f, even after encountering this error. Remember, using the correct CF root file is crucial to avoid such errors in the future.
What should I do if I’m stuck on the logo screen while trying to root my Samsung Galaxy J1 Ace SM-J110F?
If you find yourself stuck on the logo screen when trying to root your SM-J110F, there are a few potential solutions you can try.
First, make sure you’re using the Odin tool correctly. Switch to DL mode and repeat the steps you’ve previously taken.
Second, the problem could be due to a damaged or incorrect CF-Root file. Have you recently downloaded a new CF-Root file for your SM-J110F? If so, it’s possible that the file is not correct or has been corrupted in some way. If this is the case, you will need to download a new CF-Root file and try to root your SM-J110F again.
Lastly, if you’re still unable to get past the logo screen, you may need to install the Stock Rom on your device. This should resolve any issues and allow you to successfully root your Samsung Galaxy J1 Ace SM-J110F.
Remember, rooting a device can be a complex process, so be sure to follow all instructions carefully.
How do you fix a bootloop and root SM J110F using a factory reset?
Fixing a bootloop and rooting SM-J110F involves performing a factory reset on your device. To execute this, you need to first remove your battery and then reinsert it. Afterward, you must boot your device into recovery mode. This can be done by simultaneously holding the ‘Volume Up’, ‘Home’, and ‘Power’ buttons. Once in recovery mode, select ‘wipe data/factory reset’, followed by the ‘Yes’ option. This process should effectively fix the boot loop on your Samsung Galaxy J1 Ace SM-J110F.
Read more – Dedicated post
We are your trusted resource for rooting Android phones, specializing in the Samsung Galaxy J1 Ace SM-J110F. This article provides a comprehensive guide on how to root sm-j110f and make the most of your device. If you find our post beneficial, we kindly ask you to share it across all social media platforms to aid others in their quest to root their phones with our expert tutorials. Should you encounter any issues or require further assistance, please do not hesitate to leave a comment below. We are here to help you every step of the way.
Equipped with a Bachelor of Information Technology (BIT) degree, Lucas Noah stands out in the digital content creation landscape. His current roles at Creative Outrank LLC and Oceana Express LLC showcase his ability to turn complex technology topics into engaging, easy-to-understand content for their websites.
Lucas specializes in writing technology guides. His work is distinguished by its clarity and relevance, making daunting tech subjects accessible and interesting to a broad audience. His guides are not just informative but are a testament to his skill in bridging the gap between technical expertise and everyday usability.
In addition to his tech-focused articles, Lucas has a keen eye for capturing the essence of his surroundings. His writing transcends technology, as he effortlessly brings to life various observations and experiences in his articles. This versatility not only demonstrates his wide-ranging interests but also his ability to connect with readers on multiple levels.
Lucas Noah’s writing is a fusion of technical acumen and a deep appreciation for the world around him, offering readers a unique and insightful perspective on both technology and life.


