Rooting Samsung Galaxy J1 SM J100FN can open up a world of possibilities for your device. It allows you to customize and optimize your phone to your specific needs, elevating your user experience. From removing pre-installed applications to installing custom ROMs, rooting gives you the ability to take full control of your device.
However, understanding how to SM J100FN root effectively and safely is crucial to avoid potential problems. The process involves using the Odin Tool, a popular software developed by Samsung for its devices. This tool makes the rooting process simpler and more manageable. In this article, we’ll guide you through the step-by-step process of rooting your Samsung Galaxy J1 using the Odin Tool.
Read more – Why we want to root – Full Details with a guide
Table of Contents
Advantages and Disadvantages of Rooting Samsung Galaxy J1 SM-J100FN

Rooting your Samsung Galaxy J1 SM-J100FN can offer a range of advantages and disadvantages. Let’s explore both sides of the coin to help you make an informed decision.
Advantages:
- Customization: One of the biggest advantages of rooting your Samsung Galaxy J1 SM-J100FN is the ability to customize your device to suit your preferences. By gaining root access, you can install custom ROMs, themes, and mods, allowing you to personalize the look and feel of your device.
- Performance Optimization: Rooting gives you the freedom to optimize your device’s performance. You can remove bloatware, which are pre-installed apps that often consume unnecessary system resources. This can result in improved speed, smoother multitasking, and increased battery life.
- Access to Root-Only Apps: Rooting your device opens up a new world of possibilities in terms of apps. There are several root-only apps available that offer advanced features and functionalities, such as system-level backup and restore, ad-blocking, and deep customization options.
Disadvantages:
- Voiding Warranty: Rooting your Samsung Galaxy J1 SM-J100FN typically voids its warranty. This means that if anything goes wrong with your device after rooting, you may no longer be eligible for free repairs or replacements from the manufacturer.
- Security Risks: Rooting your device also exposes it to potential security risks. By granting root access, you are essentially bypassing certain security measures put in place by the Android operating system. This can make your device more vulnerable to malware and unauthorized access.
- Software Instability: Rooting your device can sometimes lead to software instability. Installing custom ROMs or mods may cause compatibility issues or introduce bugs that can affect the overall performance and stability of your device.
In conclusion, rooting your Samsung Galaxy J1 SM-J100FN can provide you with greater customization options, improved performance, and access to exclusive apps. However, it’s important to consider the potential drawbacks, such as voiding the warranty, increased security risks, and software instability. Make sure to weigh the pros and cons before making a decision, and if you do choose to root your device, proceed with caution and follow reputable guides and instructions.
Root SM J100FN – In 8 Steps
Note – First Back up your data
Step 1
- Charge your phone up to 50%.
- Download the Samsung Galaxy J1 SM-J100FN USB Driver and install it on your computer.
- Turn ON USB Debugging and Developer mode on the phone.
Step 2
Download the Odin program to your PC
- Now Download the Odin program to your laptop or to your Computer.
- After downloading, install and launch it.
Step 3
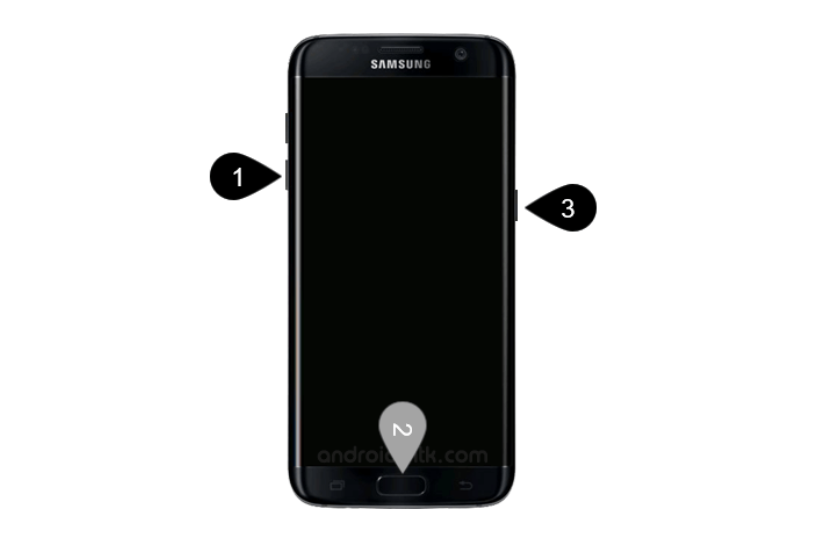
- Take your phone and Turn it OFF by pressing the power key.
- Now press and hold the Power key + Home key + Volume down key until boot to download mode.
Step 4
- Connect your phone to your PC or laptop by using a USB data cable. it’s better to use original Data cables.
Step 5
Download the CF-Root file for Samsung Galaxy J1 SM-J100FN
- Download the CF-Root file for Samsung Galaxy J1 SM-J100FN. (Yes this zip may include Odin tool again. use one of Odin.)
- CF root file is ZIP so, you have to unzip it.

Step 6
- Now press the Volume up key to continue to Download Mode.
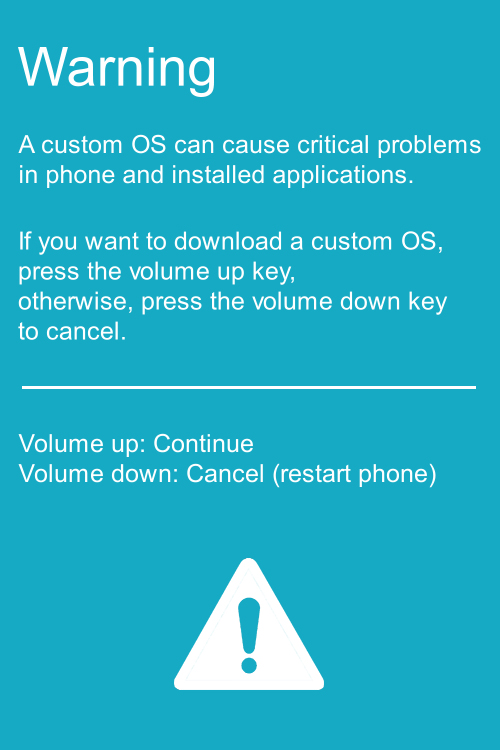
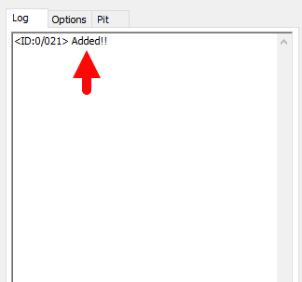
- After tapping the Volume up key, you will able to see the “Added” message in the Odin tool’s notification box.
Step 7
- Click PDA / AP and browse to the Downloaded CF-Root file.
- Select “Auto Reboot“
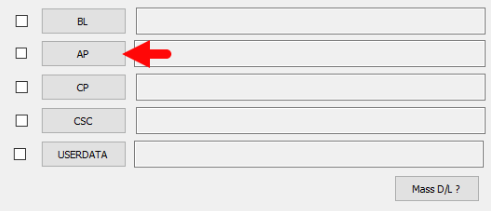
- Start Rooting by Clicking Start.
- Read More – Increase RAM SIZE after root
Step 8
- Please wait until the phone restarts automatically. And it will display a Green Pass.
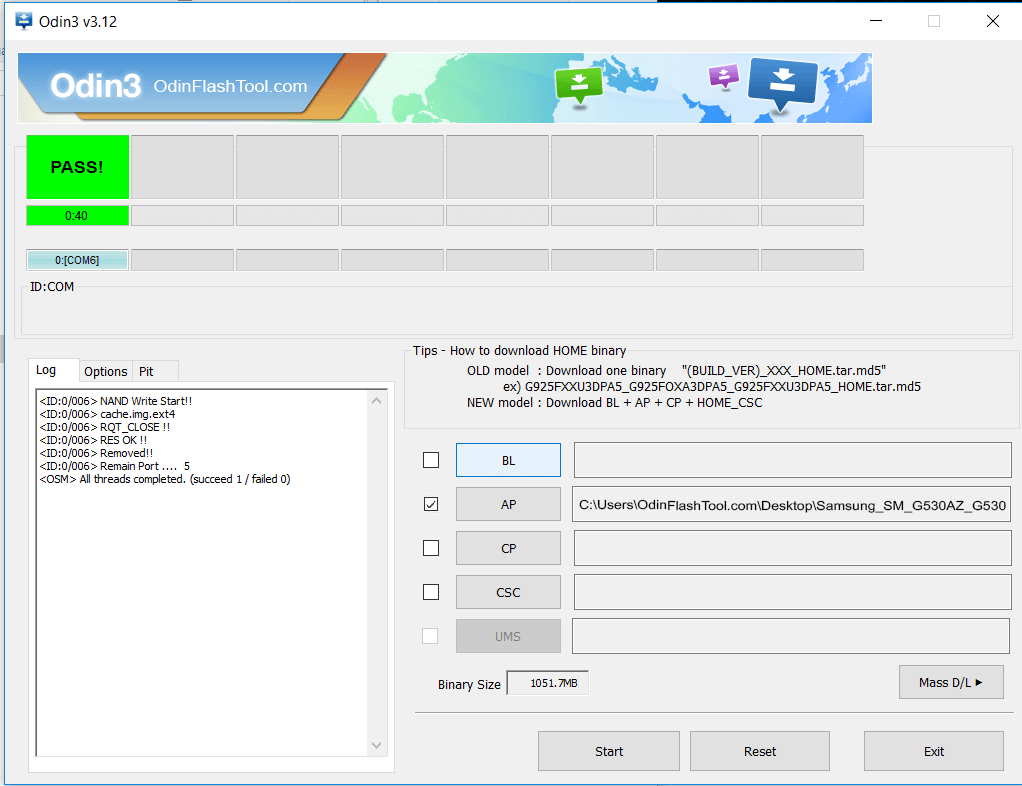
- The last step is to Factory Reset your phone after turning it on.
- Now, Congratulations you have Successfully Rooted 🙂
- Read more, OK I rooted. Now what next?
How to Verify if Your Samsung Galaxy J1 SM-J100FN Is Properly Rooted

To determine whether your Samsung Galaxy J1 SM-J100FN is rooted or not, follow these simple steps. One way to check is by looking for the presence of the app “SuperSU” on your device. If you find this app installed, it indicates that your phone has been successfully rooted. However, in case you still have doubts, you can use a reliable app that specifically verifies root access. By using this app, you will receive a clear confirmation about the status of root access on your Samsung Galaxy J1 SM-J100FN. This verification process ensures that your phone is rooted securely and allows you to proceed with confidence in utilizing the full range of rooted functionalities. Top 10 Rooted apps for android devices
Reversing the SM J100FN Root Process (Unrooting)

If you have successfully rooted your Samsung Galaxy J1 SM-J100FN and no longer require root permissions, you may choose to unroot your device. Unrooting your phone is a straightforward process that can be accomplished by following a few simple steps. By unrooting your device, you can revert it back to its original state. If you want to learn more about how to unroot your Samsung Galaxy J1 SM-J100FN, click here for detailed instructions and information.
Conclusion
In conclusion, rooting the Samsung Galaxy J1 SM-J100FN using the Odin Tool is a straightforward process that can unlock the full potential of the device. By gaining root access, users can customize their devices, install custom ROMs, and enjoy additional features and functionalities.
However, it is important to note that rooting your device may void the warranty and can be risky if not done correctly. Therefore, it is advisable to follow the step-by-step instructions provided and perform the process with caution. With the right knowledge and precautions, users can successfully root their SM-J100FN and explore a whole new level of possibilities. So, if you’re ready to take full control of your device, follow the guide above to root your Samsung Galaxy J1 SM-J100FN with Odin Tool.
Frequently Asked Questions
Is it possible to root a Samsung Galaxy J1 SM-J100FN if the phone model is not listed on the Chainfire website?
If your phone model is not listed on the Chainfire website, don’t worry. There are alternative methods available to root your Samsung Galaxy J1 SM-J100FN. It is possible that Chainfire is either in the process of developing or updating the CF file specifically for your phone model. In the meantime, you can explore other rooting apps that can help you successfully root your device. More details
Which rooting applications can be used to root a Samsung Galaxy J1 SM-J100FN?
There are several popular rooting applications available, such as KingoRoot, Kinguser, framaRoot, kingroot, Vroot, Root Master, z4root, and Root Genius. However, it’s important to note that not all of these apps may support your specific phone model, the Samsung Galaxy J1 SM-J100FN. If any of these applications do not support your device, their rooting process may fail. In such cases, it is recommended to try the CF-Root method, which is considered the standard way to root mobile phones. By using the CF-Root method, you can increase the chances of successfully rooting your Samsung Galaxy J1 SM-J100FN.
How can I fix the “kinguser binary (su) must be updated” error while trying to root sm j100fn?
To fix the “kinguser binary (su) must be updated” error on your sm j100fn root process, you need to follow these steps:
- Unroot your phone: The first step to resolving this error is to unroot your phone. This can be done through the settings of the device or using a dedicated unrooting app.
- Remove rooting apps: After unrooting, ensure to remove all apps related to rooting from your device. These may interfere with the root sm j100fn process and cause errors such as the “kinguser binary (su) must be updated”.
- Restart your phone: Once the rooting apps have been removed, restart your device. This allows the changes to take effect and prepares your phone for the sm j100fn root process.
- Follow the ‘SM j100Fn root’ guide step by step: Now, you are ready to root your Samsung Galaxy J1 SM-J100FN again. Follow the sm j100fn root guide provided above step by step to avoid any further errors.
Remember, rooting a device comes with its own set of risks. Always proceed with caution and ensure you understand the implications before proceeding.
How do I resolve the “Unfortunately, kinguser has Stopped” error while trying to root Samsung Galaxy J1 SM-J100FN?
If you encounter the “Unfortunately, kinguser has Stopped” error when attempting to root sm j100fn, follow these steps to potentially resolve the issue:
- Initially, restart your Samsung Galaxy J1 SM-J100FN.
- If the error persists, navigate to the Settings page on your device.
- From there, proceed to the app or application manager.
- Locate the kinguser app and delete both cache and data.
Performing these steps can help clear any temporary issues that might be causing the kinguser app to stop unexpectedly and may help you proceed with the sm j100fn root process successfully.
What should I do if I get the “Unfortunately, kingroot has Stopped” error on my rooted SM J100FN?
If you encounter the error “Unfortunately, kingroot has Stopped” on your rooted SM J100FN Samsung Galaxy J1, don’t worry. You can try a simple restart of your device first. If this doesn’t solve the issue, you may need to clear the cache and data of the Kingroot app. Here are the steps:
- Go to your device’s Settings page.
- Navigate to the App/Application Manager.
- Search and find the Kingroot app.
- Tap on it and select ‘Clear Cache’ and ‘Clear Data’.
These steps should resolve the error and allow you to continue using your SM J100FN root without any issues.
What should I do if I encounter errors like “Root Failed!, No Strategy Found, ConnectionUnstabitil, need root” while trying to root SM J100FN?
These errors generally occur when using a rooting app for your Samsung Galaxy J1 SM-J100FN. If you’re experiencing this, it simply means your current method isn’t effective. We highly recommend switching to the CF root method to successfully root SM J100FN. This method is quite reliable for rooting your device. Just revisit the steps mentioned above and follow them carefully. This should resolve any issues you are having with SM J100FN root errors.
How can I fix various Google Play Store error codes like Error rpc:aec:0, Error 921, Error 923, Error 491, Error 110, Error 505, Error 481, Error 923, Error 961, Error 504, Error rh01, Error 919, and Error 101 on my rooted SM J100FN device?
If you’re encountering these error codes on your rooted SM J100FN device, there are a few steps you can take to resolve the issue.
- It’s recommended to use a new Google account. This can often bypass any system errors linked to your existing account.
- Navigate to your device’s settings, then proceed to the application manager. Look for Google Play Store and delete the app’s data. In addition, you should also clear the cache. This can rectify many common errors and improve the performance of the Play Store.
- If the above method doesn’t work, consider deleting some media files to free up some space. Google Play Store errors, can sometimes occur due to insufficient storage space.
Remember, it’s essential to handle these steps with care when you root SM J100FN devices, as incorrect procedures can lead to further issues.
Why does my Samsung Galaxy J1 SM-J100FN display “could not do normal boot odin mode” after trying to root it?
The “could not do normal boot odin mode” message usually appears on your Samsung Galaxy J1 SM-J100FN when an incorrect CF root file has been used during the SM j100fn root process. Despite this, you should still be able to switch on the phone. To solve this issue, please follow the recommended steps in this solution, which guides you on how to properly root your sm j100fn. Click here
How to fix the issue of the Samsung Galaxy J1 SM-J100FN getting stuck on the logo screen while trying to root it?
If your Samsung Galaxy J1 SM-J100FN is stuck on the logo screen while trying to root, it could be due to a damaged or incorrect CF-Root file.
To resolve this, first, switch your device to DL mode through Odin. Then, repeat the sm j100fn root steps to see if the issue persists. If the problem continues, you may need to install a Stock Rom because the downloaded CF-Root file may be incorrect or damaged.
If the logo screen issue persists even after these steps, try to root your sm j100fn again with a new CF root file. This process should ideally resolve the stuck on logo screen problem during the sm j100fn root process.
How can I fix the Bootloop issue and perform a factory reset on my root SM J100FN device?
If your root SM J100FN device is stuck in a Bootloop (continuously restarting), performing a factory reset might solve the issue. Here’s a step-by-step guide on how to do it:
- First, you need to turn off your device. This can be done by removing the battery and then reinserting it back.
- Once the device is off, you need to boot it into recovery mode. You can do this by holding down the Volume Up button, the Home button, and the Power key simultaneously.
- In the recovery mode, you will find an option that says “wipe data/factory reset”. Select this option.
- A confirmation message will appear, asking you if you’re sure you want to perform the factory reset. Select “Yes” to confirm.
Remember, performing a factory reset on your SM J100FN root device will erase all your data, so ensure you have everything important backed up before proceeding.
Read more – Dedicated post
We are your go-to site for all things related to rooting Android phones. This particular post is exclusively dedicated to guiding you on how to root Samsung Galaxy J1 SM-J100FN. If you find our guide valuable, don’t hesitate to share it across all social media platforms. It’s our aim to assist others in achieving a successful sm j100fn root. Should you encounter any issues or need further assistance, feel free to leave a comment below. We’re always here to help you navigate through the rooting process.
Equipped with a Bachelor of Information Technology (BIT) degree, Lucas Noah stands out in the digital content creation landscape. His current roles at Creative Outrank LLC and Oceana Express LLC showcase his ability to turn complex technology topics into engaging, easy-to-understand content for their websites.
Lucas specializes in writing technology guides. His work is distinguished by its clarity and relevance, making daunting tech subjects accessible and interesting to a broad audience. His guides are not just informative but are a testament to his skill in bridging the gap between technical expertise and everyday usability.
In addition to his tech-focused articles, Lucas has a keen eye for capturing the essence of his surroundings. His writing transcends technology, as he effortlessly brings to life various observations and experiences in his articles. This versatility not only demonstrates his wide-ranging interests but also his ability to connect with readers on multiple levels.
Lucas Noah’s writing is a fusion of technical acumen and a deep appreciation for the world around him, offering readers a unique and insightful perspective on both technology and life.


