
Hello buddies! I am going to teach you how to install Magisk in the recovery partition and root your device that doesn’t have Ramdisk. You will see the stepwise guide below. Before moving to the guide you have to download the stock firmware of your phone and get the recovery.img file. Then we are going to patch the file using the Magisk app. By that, we can get the magisk_patched.img file. Thereafter the only thing you have to do is to flash the patched file to the recovery partition. So that you will get a rooted phone. Now let’s have a look at the steps in more detail.
Table of Contents
What is Rooting?
Rooting is like giving your Android phone special powers. It’s a way to access features and settings that are normally off-limits. For example, you can install apps that do cool things like record your screen or customize your phone’s look.
Some apps need root access to work properly. These are usually more advanced tools that can help you do things like save battery, get free stuff in games, or make your phone faster by speeding up its processor. But rooting also has risks, like voiding your warranty or even damaging your phone if you’re not careful. So, it’s important to learn about rooting and understand what you’re doing before you try it.
What is Magisk?
Magisk is a cool tool for rooting your Android phone without messing with its main system. It’s like giving your phone superpowers, letting you do more with it. You can tweak things and add new features without changing the core code of your phone. Magisk was made by Topjohnwu back in 2016, and it’s been really popular since then.
One neat thing about Magisk is that it can hide the fact that your phone is rooted from certain apps. This is handy for using apps that don’t work on rooted phones, like banking apps. So, Magisk is great for anyone who wants to customize their phone and try out new stuff without losing access to their favorite apps. It’s a simple and reliable way to get more out of your Android device.
Here are some features:
- Magisk helps you pass Google’s safety tests, so you can use apps that check if your phone is rooted (like SafetyNet).
- It’s open-source software, meaning anyone can see and change the code. If you know how to code and want to make changes, you can do that easily.
- With the Magisk Mount feature, you can make changes to the core and partition level of your phone’s files without any problems. You can organize your files and store them wherever you want in your phone’s memory.
- The Resetprop feature lets you change system prop files, including read-only files. You can even try changing the build settings of your phone.
- Magisk can be downloaded and used on a phone that’s not rooted. It can then help you root your phone if you want to.

What is Magisk App?
The Magisk App is a handy tool for managing Magisk on your Android phone. Before, getting Magisk set up was a bit tricky—you had to download different files and go through a long process. But now, with the Magisk App, it’s much easier.
You can install Magisk by just downloading the Magisk App and renaming a file. And if you ever want to remove Magisk, you can do it just as easily by renaming another file. The app also lets you decide which apps can do what on your phone, giving you more control.
Plus, there are lots of free add-ons you can get through the Magisk App to make your phone even cooler. And if you want even more stuff, you can add your own special things to the app. Overall, the Magisk App makes it simple to customize your Android phone and get the most out of it.
Version Info
| Software Name | Magisk |
| Last Updated | February 13, 2024 |
| Android Version Requires | 5.0+ |
| Total Downloads | 100,000,000+ |
| App Size | 7.11 MB |
| Developer | Topjohnwu |
| Main Task | Magisk Hides Roots from Banking Applications. |
How to Install Magisk in Recovery and Root Android
I assume that you have a piece of pretty good knowledge about the advantages of rooting a device by now. You can read the previous section for more information. However, Don t forget to backup all data before attempting the steps.
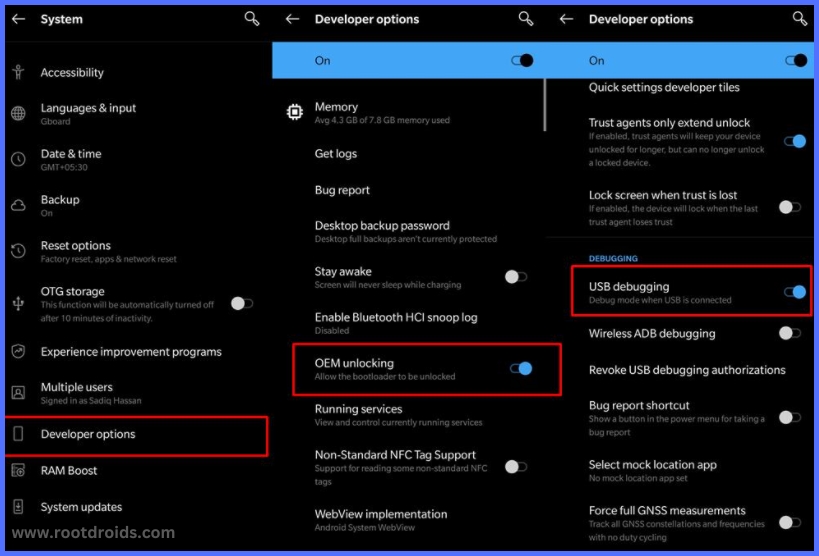
Step 1 : Enable USB Debugging and OEM Unlocking before Rooting
As the first step, you need to enable USB Debugging and OEM Unlocking on your phone. Your device will be recognizable by the PC in ADB mode when you enable OEM Unlocking. So you will be able to boot your device to Fastboot mode. Additionally OEM Unlocking is mandatory to proceed with the bootloader unlocking process. Here’s how you gonna enable those.
Settings > About Phone > Tap on Build Number 7 times > Go back to Settings > System > Advanced > Developer Options > Enable USB Debugging and OEM Unlocking
Step 2: Install Android SDK
Secondly, you need to install the Android SDK Platform Tools on your PC. I recommend you to install the exact same. That is because those are the official ADB and Fastboot Binary provided by Google. Once you have downloaded the tools, just extract them to any location on your PC. Anywhere that is convenient to you.
Step 3: Unlock Bootloader
Now you have to unlock the bootloader of the phone. If you are new to these you can read our guides on how to unlock the bootloader. But don’t ever forget that unlocking the bootloader will wipe all the device data and might void the warranty as well. So think thoroughly before proceeding with this step. Once you are done with thinking, you can learn how to unlock the bootloader by following guides.
- How to Unlock Bootloader on any Sony Xperia device
- Unlock Bootloader on any Samsung Device [New VaultKeeper Method]
- A Universal Guide to Unlock Bootloader on any Realme Device
- How to Unlock Bootloader on any Motorola Device
- Unlock Bootloader on any Realme Device
- How to Unlock Bootloader on OnePlus Devices
Step 4: Extract recovery.img from Stock Firmware
The next step is to download the stock firmware for your phone. Usually, most of the OEMs upload the firmware file to their official site. If you are a Samsung user, you can use a standalone tool like Frija to download the firmware. After downloading just extract the firmware to any convenient location on your PC.
Pixel firmware is usually present as ZIP. So you can simply extract them using WinRAR. But extracting is not such simple with other OEMs. OnePlus have their partition files in payload.bin. Oppo and Vivo use the OZIP format. Others like Spreasdtrum and Unisoc chipsets pack the firmware as a PAC file. You can read the following guides to learn how to extract files other than ZIP.
- How to Extract payload.bin and get the stock boot.img file
- Extract OZIP Stock ROM (Firmware)
- Learn How to Extract Spreadtrum and Unisoc PAC Firmware File
Step 5: Install Magisk App and Check for Ramdisk
As the step 5, you have to install the latest Magisk App v22. The word “latest” indicates the Magisk Manager and Magisk Installer ZIP both are in a single package, known as the Magisk App. Once you are finished with the installation you have to verify that the device doesn’t have the Ramdisk partition.
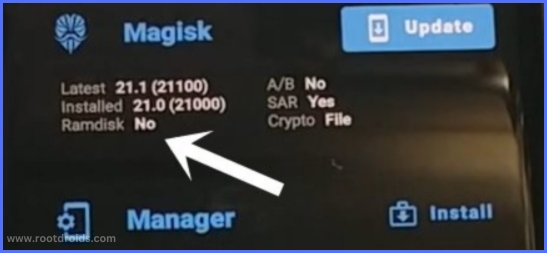
For that purpose, you have to launch the Magisk app and look under the Magisk section. If Ramdisk shows a NO, you can proceed further. If it shows a YES it’s better to root your device using Magisk patched boot.img.
Step 6: Patch recovery.img via Magisk
Here’s the step-wise guide.
- Firstly transfer the stock recovery.img file to your phone.
- Then launch the Magisk app.
- Tap on the Install button which is next to Magisk.
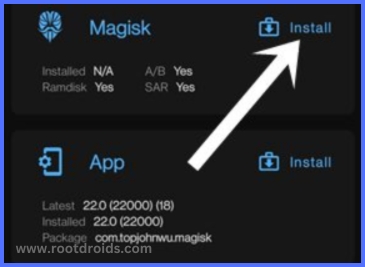
- Then checkmark Recovery Mode under the options section (only if it is not enabled by default) and tap next.
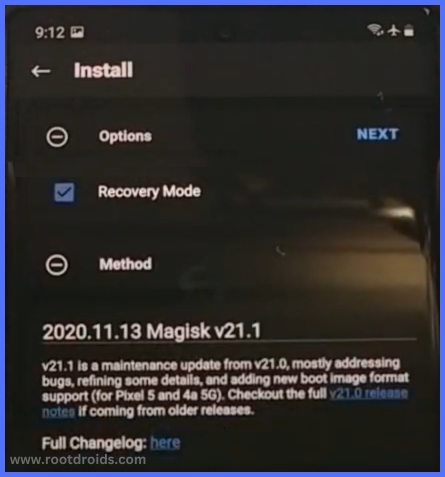
- Then navigate to the Method section and choose Select and Patch a file.
- Now browse to the extracted recovery.img file and select the file.
- Then tap on the Let’s Go button and Magisk will start patching the file.
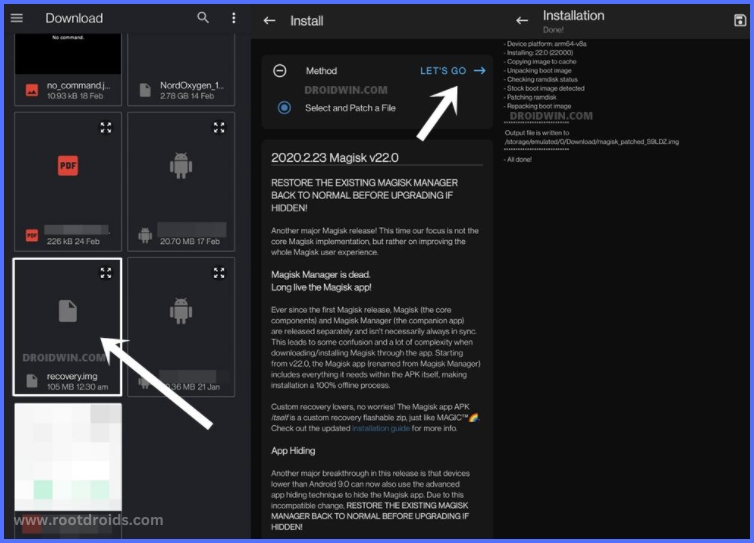
- Once the patching is completed you will have the magisk_patched[random numbers].img file in the Downloads folder of the phone.
- I recommend you to rename the file by deleting the random numbers. So you will be left with a file named magisk_patched.img.
Step 7: Boot Device to Fastboot Mode
To facilitate the next steps you need to boot your device to Fastboot Mode. Here’s how:
- First enable the USB Debugging ane connect the phone to PC using a USB cable.
- Now go to platform-tools folder and type CMD in the address bar and press enter. Or Search CMD and go to Platform tools folder via CMD.
- Now the Command Prompt will be launched.
- Then type the below command in the CMD window.
adb reboot bootloader- That’s all! Now the device will boot to the Fastboot/Bootloader mode.
Step 8: Flash Magisk Patched recovery.img via Fastboot and Root Android
Now we have come to the last step of the process. Just follow these steps to complete.
- Firstly transfer the magisk_patched.img file from the phone to the platform-tools folder on the PC.
- Then type the following command in the CMD window opened within the platform-tools. This will flash the file to the recovery recovery partition on your android device.
fastboot flash recovery magisk_patched.img- Now use the following command to reboot your device to the OS.
fastboot rebootUninstallation
The easiest way to uninstall Magisk is through the Magisk app itself. Inside the app, you’ll find an option to uninstall Magisk, which removes it cleanly from your device. However, if you prefer using custom recoveries, you can rename the Magisk APK to uninstall.zip and flash it like any other flashable zip. This process effectively removes Magisk from your device, allowing you to return to your device’s original state. Whether you choose to uninstall through the app or using custom recoveries, both methods are straightforward and effective.
Conclusion
Do you think this article on How to Install Magisk in Recovery and Root Android [No Ramdisk] is helpful? If so, please share this article on Facebook, LinkedIn, etc. And we warmly welcome your queries, comments, and suggestions. Feel free to contact us. You can join our community and open help Topic under Android. It’s totally free! And, please don’t forget to like our Facebook page. Thank you very much! Have a nice day! ????
Frequently Asked Questions
How do I know if Magisk has been successfully installed on my device?
You can check if Magisk has been successfully installed on your device by looking for the Magisk Manager app in your app drawer. Additionally, you can verify the installation by checking for the presence of the MagiskSU binary in the /sbin directory of your device’s root file system. Lastly, you can use root checker apps available on the Google Play Store to confirm if your device has been properly rooted with Magisk.
Can installing Magisk in recovery void my device warranty?
Installing Magisk in recovery may void your device warranty, as it involves modifying the system software. However, the extent to which warranty is affected can vary depending on the manufacturer and region. It’s essential to research your device’s warranty terms and conditions before proceeding with any modifications.
Can I uninstall Magisk if I no longer want to root my device?
Yes, you can uninstall Magisk from your device if you no longer want to root it. The easiest way to do this is by using the Magisk Manager app and selecting the uninstall option. Alternatively, you can flash the Magisk uninstaller zip file using a custom recovery if you prefer that method.
Are there any risks involved in installing Magisk in recovery?
There are some risks involved in installing Magisk in recovery, such as the potential to brick your device if the installation process is not followed correctly. Additionally, there is a risk of voiding your device warranty, as modifying system files can be considered tampering. It’s essential to carefully follow instructions and backup your data before attempting to install Magisk in recovery.
Editor’s choice:
Equipped with a Bachelor of Information Technology (BIT) degree, Lucas Noah stands out in the digital content creation landscape. His current roles at Creative Outrank LLC and Oceana Express LLC showcase his ability to turn complex technology topics into engaging, easy-to-understand content for their websites.
Lucas specializes in writing technology guides. His work is distinguished by its clarity and relevance, making daunting tech subjects accessible and interesting to a broad audience. His guides are not just informative but are a testament to his skill in bridging the gap between technical expertise and everyday usability.
In addition to his tech-focused articles, Lucas has a keen eye for capturing the essence of his surroundings. His writing transcends technology, as he effortlessly brings to life various observations and experiences in his articles. This versatility not only demonstrates his wide-ranging interests but also his ability to connect with readers on multiple levels.
Lucas Noah’s writing is a fusion of technical acumen and a deep appreciation for the world around him, offering readers a unique and insightful perspective on both technology and life.


