
Looking for instructions on how to root sm-j110h? You’ve come to the right place. We’ve prepared this comprehensive guide to help you root SM-j110H using the Odin Tool. Rooting your device can open up a world of opportunities, allowing you to customize your device, enhance its performance, and maximize its functionality.
If you’re keen to unlock the full potential of your device, this guide on how to root Samsung j1 ace sm j110h is just what you need. Through the root process, you’ll gain privileged control over your device, enabling you to install custom ROMs, remove pre-installed apps, improve battery life, and much more. So whether you’re an Android enthusiast wanting to explore more, or simply a user wanting to enhance your device’s performance, this guide for SM J110H rooting is the perfect starting point.
Read more – Why we want to root – Full Details with a guide
Table Of Contents
Risks associated with the SM-j110h root process

Samsung Galaxy J1 Ace SM-J110H rooting can open up a world of possibilities for customization and enhanced control, but it’s important to acknowledge that it also comes with certain risks.
- Void Warranty: One of the most significant risks associated with rooting is that it can void your device’s warranty. Most manufacturers do not support rooting and consider it as a violation of the warranty terms. This means, if your device encounters any issues after rooting, the manufacturer might not cover the repairs.
- Increased Vulnerability: Rooting your device can potentially increase its vulnerability to malware and viruses. As rooting gives you superuser access, it also allows apps to have the same level of access, potentially exposing your device to malicious software.
- Bricking: If something goes wrong during the rooting process, there’s a risk of bricking your device. This means that your device could become as functional as a brick, rendering it useless.
- Performance Issues: While rooting can often improve device performance, it could also lead to issues if not done correctly. You could experience increased battery drain, random reboots, or even system crashes.
- Data Loss: During the rooting process, there’s always a risk of data loss. Therefore, it’s essential to back up your data before starting the process.
Despite the potential risks associated, numerous users determine that the advantages of rooting their device surpass the possible hazards. The secret to a triumphant root lies in adhering to reliable guides such as this one on how to root Samsung J1 Ace SM J110H, comprehending the process thoroughly, and always ensuring a backup of your data is in place. This balance between understanding the risks and rewards makes the process of learning how to root Samsung J1 Ace SM J110H a worthwhile endeavor.
Steps on How To Root SM-J110H
Before we delve into the process of how to root SM-J110H, it’s crucial to take an essential precautionary step – backing up your data. While the rooting process is generally safe, there’s always a small risk of data loss. By backing up your data, you safeguard your important files, media, and other information stored on your Samsung Galaxy J1 Ace SM-J110H. This way, even if something goes wrong during your sm j110h rooting process, you can easily restore your data. Whether it’s your cherished photos, important contacts, or favorite apps, ensure everything is backed up before proceeding with the root process. Safety first, always!
Step 1
- Charge your phone up to 50%
- Download the Samsung Galaxy J1 ace SM-J110H USB Driver and install it on your computer.
- Turn ON USB Debugging and Developer mode on the phone.
Step 2
Download the Odin program to your PC
- Now Download the Odin program to your laptop or to your Computer.
- After downloading, install and launch it.
Step 3
- take your phone and Turn OFF it by pressing the power key.
- Now press and hold the Power key + Home key + Volume down key until boot to download mode.

Step 4
- Connect your phone to your PC or laptop by using a USB data cable. it’s better to use original Data cables.
Step 5
Download CF Root file for Samsung Galaxy J1 ace SM-J110H
- Download CF Root file for Samsung Galaxy J1 ace SM-J110H. (Yes this zip may include Odin tool again. use one of Odin.)
- CF root file is ZIP so, you have to unzip it.

Step 6
- Now press the Volume up key to continue to Download Mode.

- After tapping the Volume up key, you will able to see “Added Message” in the Odin tool’s notification box

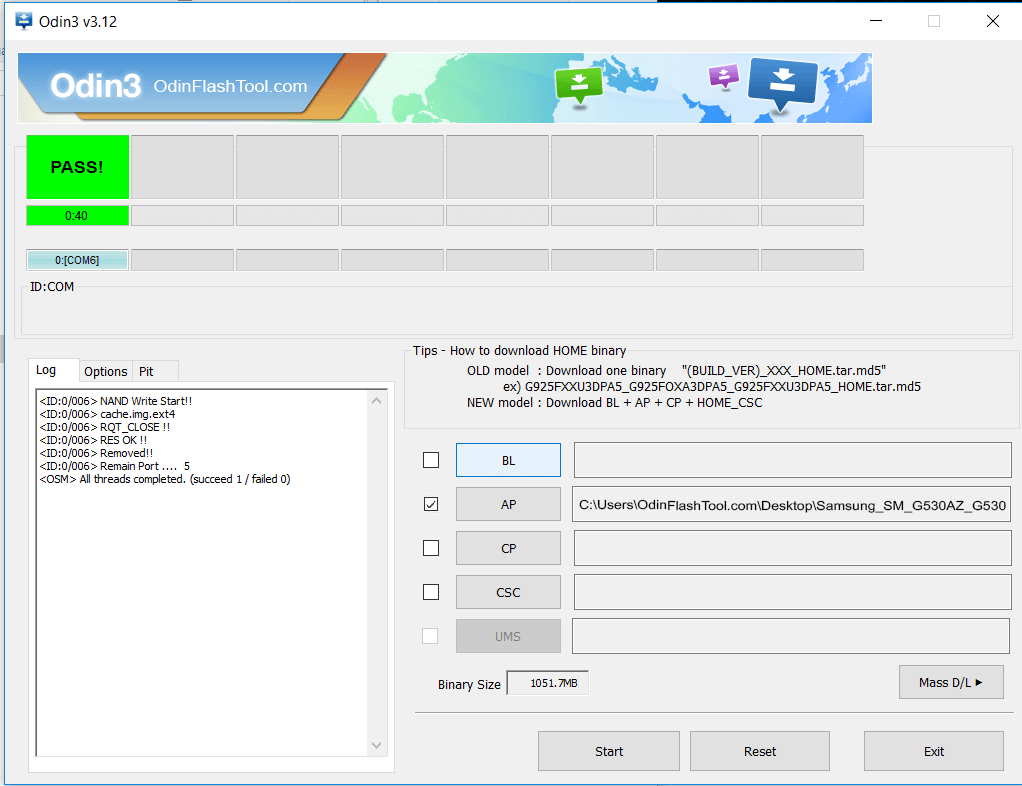
Step 7
- Click PDA / AP and browse to download CF-Root file.
- Select “Auto Reboot”

- Read More – Increase RAM SIZE after root
- Start Rooting by Clicking Start.
Step 8
- Please wait until the phone restarts automatically. and it will display a Green Pass
- The last step is to factory Reset your phone after turning on the phone
- Read more, OK I rooted. Now what next?
- Now, Congratulations you have Successfully Rooted 🙂
Check If your SM j110h Root process is Successful
To confirm whether you’ve successfully managed to root SM-J110H, there are a couple of simple tips you can follow. The first sign of a successful root is the presence of an application called “SuperSu” on your device. This application is responsible for managing any superuser privileges on your rooted device. Hence, if you notice “SuperSu” in your app drawer, it’s a clear indication that your Samsung Galaxy J1 Ace SM-J110H rooting is successful.
However, if you still have doubts or want to double-check, there’s an easy solution. Simply download and install a root checker application from the Google Play Store. A root checker app will run a thorough check on your device and provide a clear verdict on whether your device has root access or not. It’s a handy tool to confirm the root status of your smartphone, eliminating any uncertainty. So, with these tips, you can easily ensure that your phone is rooted and ready to offer you an enhanced user experience.
Top 10 Rooted apps for android devices
Unroot Samsung Galaxy J1 ace SM J110H device
After you successfully completing the Samsung Galaxy J1 Ace SM-J110H root process, you might find yourself in a position where you no longer require root permissions. Perhaps the root-specific apps no longer serve your needs, or maybe you just want to return your phone to its original state. Whatever the reason may be, you’ll be glad to know that you can easily unroot your phone if you choose to do so.
Unrooting your device is as simple as rooting it. It involves following a few straightforward steps which are designed to revert your device back to its pre-rooted state. This process allows you to remove any root permissions, effectively restoring your Samsung Galaxy J1 Ace SM-J110H to factory settings. This way, you can enjoy the simplicity and security of a non-rooted device whenever you wish. More details
Conclusion
In conclusion, learning how to root Samsung j1 Ace SM J110H is an excellent way to unlock the full potential of your Samsung Galaxy J1 Ace. By following this guide on how to root Samsung j1 ace sm j110h, you can gain greater control over your device, allowing for extensive customization and improved performance.
Whether your goal is to install custom ROMs, remove unwanted apps, or simply make your device truly your own, your SM-J110H rooting can make it possible. Remember, the benefits of the Samsung Galaxy J1 Ace SM-J110H root process are only limited by your imagination. So why wait? Start your journey towards a more personalized and optimized smartphone experience today by learning how to root Samsung j1 ace sm j110h!
Frequently Asked Questions
What if my phone model isn’t listed on Chainfire’s website?
If you can’t find your specific phone model, like SM-J110H, on Chainfire’s website, don’t worry. It might be because they are currently updating or creating the CF file for your device. In such cases, you can either wait for your model to be included, or you can opt for a different method to root your device. There are numerous trustworthy rooting apps available that can help you achieve the same result. So, you’ll still be able to root your phone and unlock its full potential. More details
What should I do if I receive a message stating “The Superuser binary (su) must be updated” or “su binary needs to be updated”?
If you encounter such a message, it typically indicates that the Superuser binary on your rooted device needs to be updated. Here’s a simple process you can follow to resolve this issue:
- Unroot your device. This involves removing the root permissions from your phone.
- Remove any rooting apps you have installed. These apps often interfere with the updating process.
- Restart your phone. This will refresh the system and prepare it for the re-rooting process.
- Once your phone has restarted, follow our guide on how to root SM-J110H step by step.
By following these steps, you should be able to update the Superuser binary successfully and continue enjoying the benefits of a rooted device.
What steps should I take if I get a message stating “Kinguser binary (su) must be updated”?
If you receive a message indicating that the Kinguser binary (su) needs to be updated, you can follow these simple steps to resolve the issue:
- Start by unrooting your phone. This will remove the root permissions granted to your device.
- Proceed to uninstall any rooting apps that you have installed on your phone. These apps may interfere with the updating process.
- After you’ve uninstalled the rooting apps, restart your phone. This step is crucial as it refreshes your system, preparing it for the re-rooting process.
- Once your phone is up and running again, follow the guide provided above on how to root your SM-J110H, step by step.
By following this process, you should be able to successfully update the Kinguser binary and continue enjoying the benefits of your rooted device.
What should I do if I encounter the “Unfortunately, Kinguser has Stopped” error on my Samsung Galaxy J1 ace SM-J110H?
If you’re facing the “Unfortunately, Kinguser has Stopped” error on your Samsung Galaxy J1 ace SM-J110H, here are a few steps you can follow to resolve the issue:
- Initially, try restarting your device. This often resolves minor software glitches.
- If the problem persists after restarting, navigate to your device’s settings page.
- From the settings menu, select ‘Apps’ or ‘Application Manager’, depending on your device’s interface.
- Scroll through the list of installed apps, and find ‘Kinguser’.
- Upon selecting ‘Kinguser’, you’ll see options to ‘Clear cache’ and ‘Clear data’. Proceed to delete both cache and data.
These steps should help rectify the issue and allow you to continue using your rooted Samsung Galaxy J1 ace SM-J110H without any errors.
What should I do if I encounter the “Could not do normal boot Odin mode” error?
The “Could not do normal boot Odin mode” error usually occurs when an incorrect CF root file is used during the rooting process. Even though this error prevents normal booting, you can still switch on your phone. To resolve this, please follow the solution provided as follows: Click here
What should I do if my Samsung Galaxy J1 ace SM-J110H is stuck on the logo screen after attempting to root?
If your Samsung Galaxy J1 ace SM-J110H is stuck on the logo screen after the rooting process, it could be due to a damaged or incorrect CF Root file, or a hiccup in the rooting process. Here’s what you can do to resolve this:
- First, switch your device to Download Mode (DL mode) and repeat the steps you initially followed for rooting.
- If the issue persists, it’s possible that the CF Root file you downloaded is either damaged or incorrect. In this case, try downloading a new CF Root file and repeat the rooting process.
- If you still can’t get past the logo screen, you may need to install the Stock ROM to restore your device to its factory settings.
- After restoring your device with the Stock ROM, you can try rooting again with a new CF Root file.
By following these steps, you should be able to resolve the issue and successfully root your Samsung Galaxy J1 ace SM-J110H.
What should I do if my device gets stuck in a bootloop (continuous restart) after attempting to root?
If your device is stuck in a bootloop after trying to root, it means that your device is unable to fully load its operating system. To resolve this issue, you will need to perform a factory reset. Here are the steps:
- Begin by removing the battery from your device and then reinsert it. This is to ensure that your device is completely turned off before you start the process.
- Now, boot your device into recovery mode. To do this, hold down the Volume Up button, Home button, and Power key simultaneously.
- Once you’re in recovery mode, navigate to and select “wipe data/factory reset”.
- A confirmation prompt will appear. Select “Yes” to proceed with the factory reset.
Please note that performing a factory reset will erase all data on your device, so make sure you have a backup of any important data. After the reset, your device should exit the bootloop and operate normally. You can then attempt to root your device again, ensuring you follow the correct steps.
We are the dedicated site for rooting Android phones. this is our dedicated post for Samsung Galaxy J1 ace SM-J110H. If you think this post is useful then please share this post on all Social media and help others to root their phones with rootdroids. If you have any problem feel free to leave a comment below, then we can help you.
Editor’s Choice
How to Root Samsung Galaxy J1 ace SM-J111F
How to Root Samsung Galaxy J1 ace SM-J110F
Equipped with a Bachelor of Information Technology (BIT) degree, Lucas Noah stands out in the digital content creation landscape. His current roles at Creative Outrank LLC and Oceana Express LLC showcase his ability to turn complex technology topics into engaging, easy-to-understand content for their websites.
Lucas specializes in writing technology guides. His work is distinguished by its clarity and relevance, making daunting tech subjects accessible and interesting to a broad audience. His guides are not just informative but are a testament to his skill in bridging the gap between technical expertise and everyday usability.
In addition to his tech-focused articles, Lucas has a keen eye for capturing the essence of his surroundings. His writing transcends technology, as he effortlessly brings to life various observations and experiences in his articles. This versatility not only demonstrates his wide-ranging interests but also his ability to connect with readers on multiple levels.
Lucas Noah’s writing is a fusion of technical acumen and a deep appreciation for the world around him, offering readers a unique and insightful perspective on both technology and life.


